Author: Adam Fowler

Lenovo Yoga 3 Pro Review


I recently reviewed the Lenovo Yoga Pro 2 which I tink is a really awesome laptop. Now, I’ve had a chance to check out the newer Lenovo Yoga Pro 3 which is a bit different again, while being another solid laptop. This will be a mix between looking at the Yoga 3, and comparing it to the Yoga 2. Here’s my thoughts:

Firstly, the model I received was silver. It’s a nice silver, but the Clementine Orange colour of the Yoga Pro 2 which is also available for the Yoga Pro 3 really grew on me, which I was surprised about. Given the choice, I’d pick orange – but the silver probably looks a bit more professional. My other slight disappointment was that Ashton Kutcher, Lenovo Product I Engineer wasn’t featured on my laptop as per the picture:

I moved on fairly quick from that. Here’s the specs of the laptop I have:

DESCRIPTION LENOVO YOGA 3 PRO MULTIMODE ULTRABOOK
Processor Intel® Core™ M-5Y70 Processor (4M Cache, 1.1GHz), Turbo Boost 2.0 (2.6GHz)
Operating system Windows 8.1 64-bit
Display 13.3″ QHD+ (3200×1800), 300nits, 16:9 aspect ratio, with Gorilla glass
Graphics Intel HD Graphics 5300
Memory 8GB, PC3-12800 1600MHz LPDDR3, soldered to system board
Webcam 1.0-megapixel, 720p HD Camera, fixed focus, with dual array microphone
Storage 256GB
Dimensions 330 x 228 x 12.8 mm
Weight 1.19kg
Case colour Platinum Silver
Battery life Up to 9 hours
Audio support Integrated JBL® stereo speakers
Wireless LAN 802.11ac, with Bluetooth 4.0
Ports 2 x USB 3.0
DC-in with USB 2.0 function
Combo audio/microphone jack
4-in-1 card reader (SD, MMC, SDXC, SDHC)
Micro-HDMI

There’s several interesting points here, especially when comparing to the Yoga Pro 2 specs.

The CPU is an Intel Core M model, rather than the i series in the Yoga Pro 2. In a generel performance shootout, the i7 that I had slightly beats the Core M in terms of speed and performance, but the Core M has much more efficient power usage. The Yoga Pro 3 is very quiet when running (there is a fan, but quieter than the Yoga 2 Pro’s). The Yoga 2 Pro gets rather hot when under full load, where as the Yoga Pro 3 only gets slightly warm; a big difference between the two.

This smaller, more power efficient Core M CPU also means the laptop itself can be thinner. Keep in mind that the lower end Yoga Pro 2 comes with an i5 CPU which seems to be so close on performance vs the Core M, you’d notice no difference. There’s also a higher end Yoga Pro 3 than what I have, with the Intel Core M-5Y71 Processor (4M Cache, 1.2GHz), Turbo Boost 2.0 (2.9GHz) CPU which will give you a little extra performance if needed.

There’s not that much difference grunt wise between all these options though, and unless you’re doing really intensive CPU work, they’ll all be more than fast enough for your requirements. The real benefit of the Yoga 3 is the lowered power consumption.

Display is the same between both models, with the very high QHD resolution. Both laptops have amazing screens. Not much else to be said here!

WP_20150325_17_05_41_ProLenovo Yoga Pro 3 Screen

Keyboard wise, it’s very similar to the Yoga Pro 2. Keys are spaced nicely and it’s nice to type on. The trackpad is a little nicer – I’d still prefer having a separate right click button, but haven’t found any issues with clicking the wrong part.

WP_20150325_17_05_23_ProLenovo Yoga Pro 3 Keyboard

Onboard graphics has jumped from the Intel HD 4400 model which has become commonplace, to the HD 5300. There’s no huge difference between these, so again you won’t notice much difference. Intel have a list of games that are playable at 30fps or higher with this chipset, which by no means is an extensive list – but gives you an idea of the capability.

8GB of RAM is more than enough these days, unless you’re doing fairly crazy high end work, or trying to run multiple Virtual Machines – not really what this laptop is designed for. Standard photo and video editing is fine of course. The RAM is soldered onto the motherboard itself which is becoming standard in slim line laptops to save on space.

The internal drive for the Yoga 3 is a 256GB SSD, same as what I had on the Yoga 2. If that’s not enough, there is a 512GB option. Plenty for a laptop!

The Yoga 3 is a rather thin 12.8mm in thickness – thinner than the Yoga 2’s 15.5mm. As a comparison, the Macbook Air‘s thickness is 17mm – so both of these are really thin! Weight wise, the Yoga 3 is also 200 grams lighter than the Yoga 2, and 160grams lighter than the Macbook Air.

Battery life is around the same – again one of those things that is hard to measure and dependent on many factors. You generally won’t get a full day’s work out of it (the 9 hours is really a best case scenario if it’s on the dimmest setting and doing nothing), but it’s still pretty decent for a thin laptop. Power plugs are everywhere anyway! One day we’ll have a Windows capable laptop that can run for a full 8 hour working day under load, and not be chunky (Lenovo Helix with it’s second battery in the keyboard falls into the chunky category).

Ports are pretty standard, apart from the power jack. Recently Lenovo has been using a rectangle plug around the size of a USB-A in most their models, including the Helix, Yoga 2 Pro, Carbon X1 and so on – but the Yoga 3 has a different plug. This time it’s USB-A shaped with an angled end:

The angled end plugs into the laptop, and the standard USB-A rectanged end plugs into the power pack. The reason they’ve done this, is to let the port on the laptop double up as a normal USB port. I like the idea of that, but wish they’d done it sooner and standardised – but my guess is that it’s something to do with the new lower power usage of the Intel Core M CPU.

The other benefit of this new cable is the power plug – it will support a normal USB cable and charge your phone or tablet. It gives you a double up on the usefulness of the plug.

The operating system that comes with the Yoga Pro 3 is Windows 8.1 – not the pro version. This may not bother most, but to see if there’s a feature you need have a look at this comparison chart from Microsoft. This OS is not for use in a business environment, as it won’t join a domain – but in saying that, many businesses should have their own licensing agreement with Microsoft and not care about OEM licenses.

I almost forgot – the hinges. The hinges between base and screen are a new style, and look like they’re off a watch. They look pretty classy, and are very functional. The Yoga Pro 2 had a different style which also worked well, but was probably too thick for the thinner Yoga Pro 3.

WP_20150325_17_04_53_ProLenovo Yoga Pro 3 Hinges

@dgaust from Twitter recently bought a Lenovo Yoga Pro 3, so I asked him for his thoughts on the device:

He also mentioned he would have preferred dedicated function keys which is a fair comment, but personally I’m used to just using the function button combo’d with the number keys to get function key usage. I prefer this over the 2nd Generation Carbon X1’s context sensitive panel, which can be frustrating to toggle through.

All in all, the Lenovo Yoga Pro 3 is an incredibly light and thin laptop, with low power consumption, good battery life and reasonable power that should make most people quite happy to use.

At the time of writing, the base model which I have been using is $2099 AU including GST and delivery.

If you have any questions about the laptop feel free to ask in the comments.

Thanks to Lenovo for providing this laptop for review, and thanks to both @Ant1958 and @AdrianGHughes for asking extra questions which helped in this review.

Internet Of Things Light Up Challenge – Part Two

Read Part One Here

Read Part Three Here
Read Part Four Here

Details of this project are on GitHub here where you can get the parts and do this yourself.

I eagerly took the items home and started following the Internet Of Things Maker Den Instructions to make my device.

Lab 1 was to get all the wires, resistors, the LED, temperature sensor and photocell all connected up on the breadboard. It was a bit bewildering to see a pack of 500 resistors, but only a few were actually used:

WP_20150307_11_22_28_Pro

After finding and extracting the resistors I needed, I was supposed to build this:

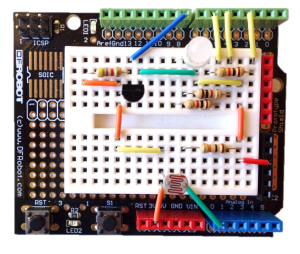
proper iot 2

Here is my finished result. Can you spot the mistake I made?

WP_20150307_11_31_33_Pro

Took me a while to find it, but that was Lab 1 complete.

WP_20150309_23_09_56_Pro (1)

Lab 2 (called Blinky) was a bit more of a challenge, since I don’t use Visual Studio. I was stuck on this for a while until Microsoft’s Dave Glover (Twitter @dglover) answered my tweets of desperation. My issue ended up being a configuration issue in Visual Studio where I was deploying to an emulator rather than USB (this device connects via micro-usb for both power and data). After that was changed, my code successfully deployed to the Netduino, resulting in a red flashing LED:

WP_20150310_22_29_23_Pro

Awesome! Since it’s a multi-coloured LED, I could change the code to make it blue:

WP_20150310_22_43_28_Pro

Or green:

WP_20150310_22_42_26_ProThe party’s over now, onto the next lab.

Lab 3 was just about seeing the temperature and light sensor work, piping back values to Visual Studio. Nothing exciting to screenshot here, it all just worked perfectly.

Lab 4 was changing the code again, but this time downloading a dashboard that would visually show the two values of light and temperature. The device had to have a network cable plugged in, so it would send it’s data to Azure, and the dashboard then showing the values off of Azure. Here’s my two gauges:

Untitled


Lab 5 was just adding a bit of extra code to uniquely identify the device, in preperation for Lab 6.

Lab 6 requires a NeoPixel Ring, Grid or Strip which I don’t have yet – it’s in the mail. That will be covered in Part Three.


Password Expiry Notification Script Part 2 – Who’s Expiring?

This is a brief modification to the Password Expiry Notification Script, which seems to be pretty popular.

Amnon Hoppe contacted me from the blog, and passed on a few extra scripts with some other ideas. He has collaborated and adjusted two scripts, to quote him “one to email only the admin/service desk with a list of all users that are about to expire and the other is to do that AND also email the end users in question to warn them to verify/take action to prevent lockout.”

I’ll add them here to share. I haven’t tested these, but have gone over them to make sure nothing malicious is going on.

Accounts2Expire2EndUsers (1)

Accounts2Expire2Admin (1)

Thanks Amnon!

These scripts are a bit more complex, but they’re good examples of what you can do, as well as a different approach from what I took, for a very similar purpose (Those are for account expiry, while mine was for password expiry)

I thought about adjusting the scripts, but after spending some time on it, I thought I’d leave them as is, but take the idea of displaying the users affected, then apply that to my own script. This is similar to the original, but it’s purpose is to just list the users who’s passwords expire in X days or less. This might be handy over a holiday for example, to know who’s going to have their password expire and then contact them to help. You should easily be able to combine the old and new scripts if you want to generate an email with this information on yourself.

Password Expiry List (rename to .ps1)

Here’s the script, which if you compare to the original is very similar. Instead of generating an email, we’re creating a list of users that have the password expiry due on X days or less (represented by the -le comparison operator, rather than -eq, a list is here). The list is then echo’d out to the console.

#################################################
# Please Configure the following variables….
# expireindays1 = How many days maximum the password has to expire (e.g. 7 will be up to 7 days)
$expireindays1 = 7
#################################################

#Get Users From AD who are enabled
Import-Module ActiveDirectory
$users = get-aduser -filter * -Properties enabled, passwordneverexpires, passwordexpired, emailaddress, passwordlastset |where {$_.Enabled -eq “True”} | where { $_.PasswordNeverExpires -eq $false } | where { $_.passwordexpired -eq $false }

$ListOfNames = @()
foreach ($user in $users)
{
$Name = (Get-ADUser $user | foreach { $_.Name})
$emailaddress = $user.emailaddress
$passwordSetDate = (get-aduser $user -properties passwordlastset | foreach { $_.PasswordLastSet })
$PasswordPol = (Get-AduserResultantPasswordPolicy $user)
# Check for Fine Grained Password
if (($PasswordPol) -ne $null)
{
$maxPasswordAge = ($PasswordPol).MaxPasswordAge
}

else
{
$maxPasswordAge = (Get-ADDefaultDomainPasswordPolicy).MaxPasswordAge
}

$expireson = $passwordsetdate + $maxPasswordAge
$today = (get-date)
$daystoexpire = (New-TimeSpan -Start $today -End $Expireson).Days

if ($daystoexpire -le $expireindays1)
{
$ListOfNames += $Name

}

}
echo $listofnames

Outlook Patch KB2956128 Breaks Profile Changing (and KB3054881)

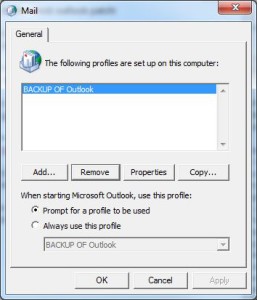
With Outlook 2010, I have profiles automatically created*. This means a user can just launch Outlook for the first time with all their account settings populated. The flow on effect of this is that from the Mail control panel program, clicking Add will also auto-populate the account using our email server and the signed in user’s email address.

outlook2

Once the new profile was created, you can normally go to Properties > Email Accounts > Change – from there, you can enter a different user’s name and use their Exchange account instead (assuming you have permission). This is handy for people who need secondary profiles for Outlook for whatever reason, or for Admins.

outlook

Except, now I can’t change the account from my own. The User Name field for the Change Account window is greyed out! It never used to be. After doing some digging around, assuming some policy must have changed I finally worked out that the latest update for Outlook had caused this.

The culprit is KB2956128, the February 10, 2015 update for Outlook 2010. After removing this update from my PC, the field was no longer greyed out and can now be changed.

outlook3

Another weird effect of this patch was that one of the profiles disappeared when it was installed, then reappeared after the patch was removed.

My guess is that this problem stems from the listed issue being fixed, but I’m only guessing:

February 10, 2015 update for Outlook 2010 (KB2956128)

    • Although you deploy the Microsoft Outlook 2010 policy Prevent copying or moving items between accounts (registry entry DisableCrossAccountCopy), Outlook 2010 still lets certain user rules to move or copy organization email messages to an Outlook Data (.pst) file or another email account.


There are some other grumblings about this patch breaking addins, OCS crashing, password prompts and search functionality on public folders. I didn’t see my particualr issue mentioned though… here’s a few links:

http://www.reddit.com/r/sysadmin/comments/2voun5/patch_tuesday_kb2956128_breaks_mailexpress/

http://www.infoworld.com/article/2884204/patch-management/users-report-that-kb-2956128-is-causing-outlook-failures.html

https://social.technet.microsoft.com/Forums/office/en-US/af1df139-e8f4-4950-9f6d-147e21c40f92/ol2010search-problems-after-install-kb2956128?forum=outlook

The worrying part of this is it seems to be yet another patch that’s causing issues in the Microsoft world. They haven’t had a very good run of patches lately, when a year ago a bad patch was surprising. Let’s hope they start testing these more thoroughly again.

* Update 6th March 2015 – I just wanted to clarify that in my work environment, we are pushing settings that force the auto creation of a profile. If you’re not doing this then you’re probably not affected as much by this particular issue because you’ll be prompted for the details such as Exchange Server and Email address, but there’s still several weird issues that have arisen from this patch – so either hold off or do extra testing on this one!

* Update 11th August 2015 – I’ve now noticed that a new update KB3054881 replaces KB2956128, and also breaks this functionality. Uninstalling the update immediately fixes it.

* Update 26th August – KB3055041 replaces the last KB, and still breaks it. I’m going to guess any future Outlook 2010 updates break this.


Internet Of Things Light Up Challenge – Part One

Read Part Two Here
Read Part Three Here
Read Part Four Here

Frankie Moore from La La Ninja has decided to run an ‘Internet Of Things Light Up Challenge‘ which I signed up for (Sorry, signups are closed now!).

The challenge is about building an internet enabled device using an open source electronics platform, which runs the .NET Micro Framework to build ‘something’. In this case, my understanding is that it’ll be a device that can light up – if it lights up, you win an Xbox One!

I have very little programming knowledge, so this is a great entry level project for me. Over several weeks we’ll be given tutorial videos to follow so we can build this device. I just need to install a copy of Visual Studio 2013 and I’ll be ready to go.

A few days ago, the package for this project turned up. I had no idea what to expect, but this is what was in the box:

WP_20150303_11_33_06_Pro

WP_20150303_11_47_14_Pro

Not what I was expecting! A bunch of resistors (500 of them!), some boards, wires… and the best bit, a Netduino Plus 2. Specs of this cool little computer are available here, but here’s the basics:

CPU: STMicro 32-bit 168MHz
RAM: 100+ KB
Code Storage: 384 KB
Ports: 10mb Ethernet, MicroSD, MicroUSB

I’ll post more as the project continues, and I’m really looking forward to it!