IT

Five Generations Of The Lenovo ThinkPad X1 Carbon

This is an updated version of the original Lenovo X1 Carbon – Three Generations post.

The X1 Carbon is part of Lenovo’s Thinkpad series. These are normally aimed at businesses, due to their military-spec testing. Consumer models of Lenovo laptops are still of high quality, but don’t have the same stringent testing and guarantees. Thinkpads have been around since 1990 – then they were owned by IBM, but Lenovo bought out IBM’s personal computer business in 2005 and continued with the name.
How do you know what generation of X1 Carbon you have, or which one to buy? Here’s the breakdown of the differences between each model:
Generation 1

Originally, the Lenovo X1 Carbon Gen1  launched in 2012. It was the successor to the Thinkpad X1, and was quite popular when it hit the market, but there were a few major drawbacks. No touchscreen, and a 14″ 1600 x 900 res screen were still good, but not in the realm of amazing. This was partly resolved about 4 months later at the start of 2013, when a touchscreen variant, inventively called the Lenovo X1 Carbon Touch. This still had the lower resolution though, while the Lenovo Helix released at the same time had a much smaller 12″ screen yet ran at 1920 x 1080.

Battery life was quite good too, Lenovo quoting 8 hours under ideal conditions. For a 2012 laptop, that was pretty impressive.

lenovo x1 carbon gen1 keyboardLenovo X1 Carbon Touch Gen 1 Keyboard

The Gen 1 laptop was powered by a 3rd Generation Intel CPU, Intel HD 4000 graphics chip . It weighed in at 1.54kg. Keyboard wise, this was the standard design that most Thinkpad laptops had, and worked well.

Generation 2

Then in early 2014, the Lenovo X1 Carbon Gen 2 launched. For the CPU, Lenovo had moved to the 4th Generation of Intel CPUs. Screen wise, the base model was still the 1600 x 900 res, but there was also upgrades available – a massive 2560 x 1440 resolution with an additional touchscreen optional.

Several new design changes were made, and not all were seen as improvements. The biggest was a new feature called the ‘Adaptive Keyboard Row’ which was a long LCD panel at the top of the keyboard. Instead of actual buttons for function keys, it was now a cycling set of images that let you toggle to the keys you wanted – standard function keys, or 3 other screens of laptop shortcuts. Software could be installed to auto detect the most likely keyboard option you’d need, but personally I’d almost always want the function keys. It was also possible to always default to the one you wanted which made it more usable. Personally, I’d rather just have keys and a function button.

Other major changes were the dropping of the left and right buttons on the trackpad – now it was just where you clicked on the trackpad. I prefer those physical buttons. A strange adjustment was removing the caps lock key, and replacing it with ‘Home’ and ‘End’ buttons. For anyone who uses a keyboard regularly, changing the placement of buttons to the opposite side of the keyboard than you’d expect them to be isn’t a great design choice.

Caps lock was still possible to do by pressing ‘Shift’ twice, and that would light up a tiny LED on the shift key to indicate Caps Lock was on. Another strange design choice, as it was very easy to accidentally press Shift twice, and start typing in capitals.

The power port was also doubled up to support OneLink docks, which lasted for another generation before being replaced by Onelink+, and in the 5th generation, abandoned completely.

Despite these changes, the laptop was still solid overall. For it’s weight, it was 200 grams lighter than it’s predecessor at 1.34kg. The graphics had been updated to Intel HD 4400/5000, and battery life was ‘a bit longer’ at around 9 hours.

lenovo x1 carbon gen 2 keyboardLenovo X1 Carbon Touch Gen 2 Keyboard

The laptop was also thinner, and sported more ports than the Gen 1. Between then Gen 1 and Gen 2, each had it’s pros and cons. If only they could mash them together to make the perfect laptop…

Generation 3

Enter the Lenovo X1 Carbon Gen3 in early 2015. A 5th Generation Intel CPU would be inside each laptop, along with another updated Intel HD 5500 graphics chip. The base level resolution had been bumped up to 1920 x 1080, with the standard 2560 x 1440 high res option available, along with a touch variant.

Battery life had gone up another hour or so, to 10ish hours depending on what screen you had. It hadn’t shed any weight, depending on the variant it came in at somewhere between 1.31kg and 1.44kg, which is still rather light and comparable to the MacBook Air.

WP_20150331_17_19_20_Pro

Lenovo X1 Carbon Touch Gen 3 Keyboard

The adaptive keys were gone, function keys were back. Caps lock had it’s place back on the keyboard too, with Home and End being moved to the right side of the keyboard again. The trackpad had it’s left and right mouse buttons back too!

Almost perfect, except they put the function key back in the bottom left hand corner. For people used to finding the Ctrl button there, it’s a bit of a change to get used to (and Gen 1 had the key in the same spot). Really, it should be one key over – such as Lenovo’s Yoga 2 Pro has.

Generation 4

2016 brought in the X1 Carbon Gen 4 and along with it, a similar new X1 Yoga which I reviewed. The touchscreen which had been standard for the last three models had now gone, which to me made the Yoga a better buy. Again, an updated Intel CPU was used – 6th generation i Series. The onboard graphics, (the 520) gets a bit of a bump too. This laptop also had OneLink+ support for the dock, which meant a new dock if you’d invested in the original OneLink.

Lenovo X1 Carbon Touch Gen 4 Keyboard (not the standard US/AU keyboard pictured via @jonolafs)

Battery life was slightly improved, with a now 11 hour claim. It also dropped some weight, down to 1.18kg which was a decent jump down. The fingerprint reader has been upgraded to a press sensor, rather than the swipe style – This newer style is quicker to use, so a welcome change. This one also came in a bit thinner at 16.5mm, where the last model depending on screen specs, was between 17 and 20mm.

Generation 5

As we’ve now grown to expect, 2017 brought in the X1 Carbon Gen 5. Another CPU upgrade too, the 7th gen Intel CPU (which is also the first to not support anything less than Windows 10). This model is so far the most radically different from previous years. Battery life is now up to 15.5 hours, and the entire laptop itself is much smaller. Check out the pictures further down to see the difference, as Lenovo have slimmed out the bezel around the display, making the entire unit more compact. It’s slightly thinner at just under 16mm. This has lead to only a slight weigh increase, now down to 1.14kg. I was surprised at how light this laptop feels when carrying it.

Lenovo X1 Carbon Touch Gen 5 Keyboard

The other drastic changes on this laptop are the ports. The old rectangle plug is gone, in favour of a standard USB-C connection. Actually, they’re Thunderbolt 3 ports. Confused? So is everyone else, but both types of devices/cables will work here. USB-C and Thunderbolt seem to be the new standard that pretty much all the manufacturers are moving to now, so it’s good to see Lenovo go along with that. The ports look the same, and the plug style is identical. Regardless, those old power packs won’t help you any more.

Oh, and there’s now a silver version that releases a bit later than the standard black version, for those who think black is ‘so 2016’.

Lenovo X1 Carbon Touch Gen 5 – Silver

The 2017 X1 Yoga Gen 2 isn’t out yet, so I can’t comment on that – but I’d expect it to again be an all rounder, and maybe a better choice if you want touch screen and tablet mode. Otherwise, the Carbon will give a pure laptop experience which may be all you want.

More Photos

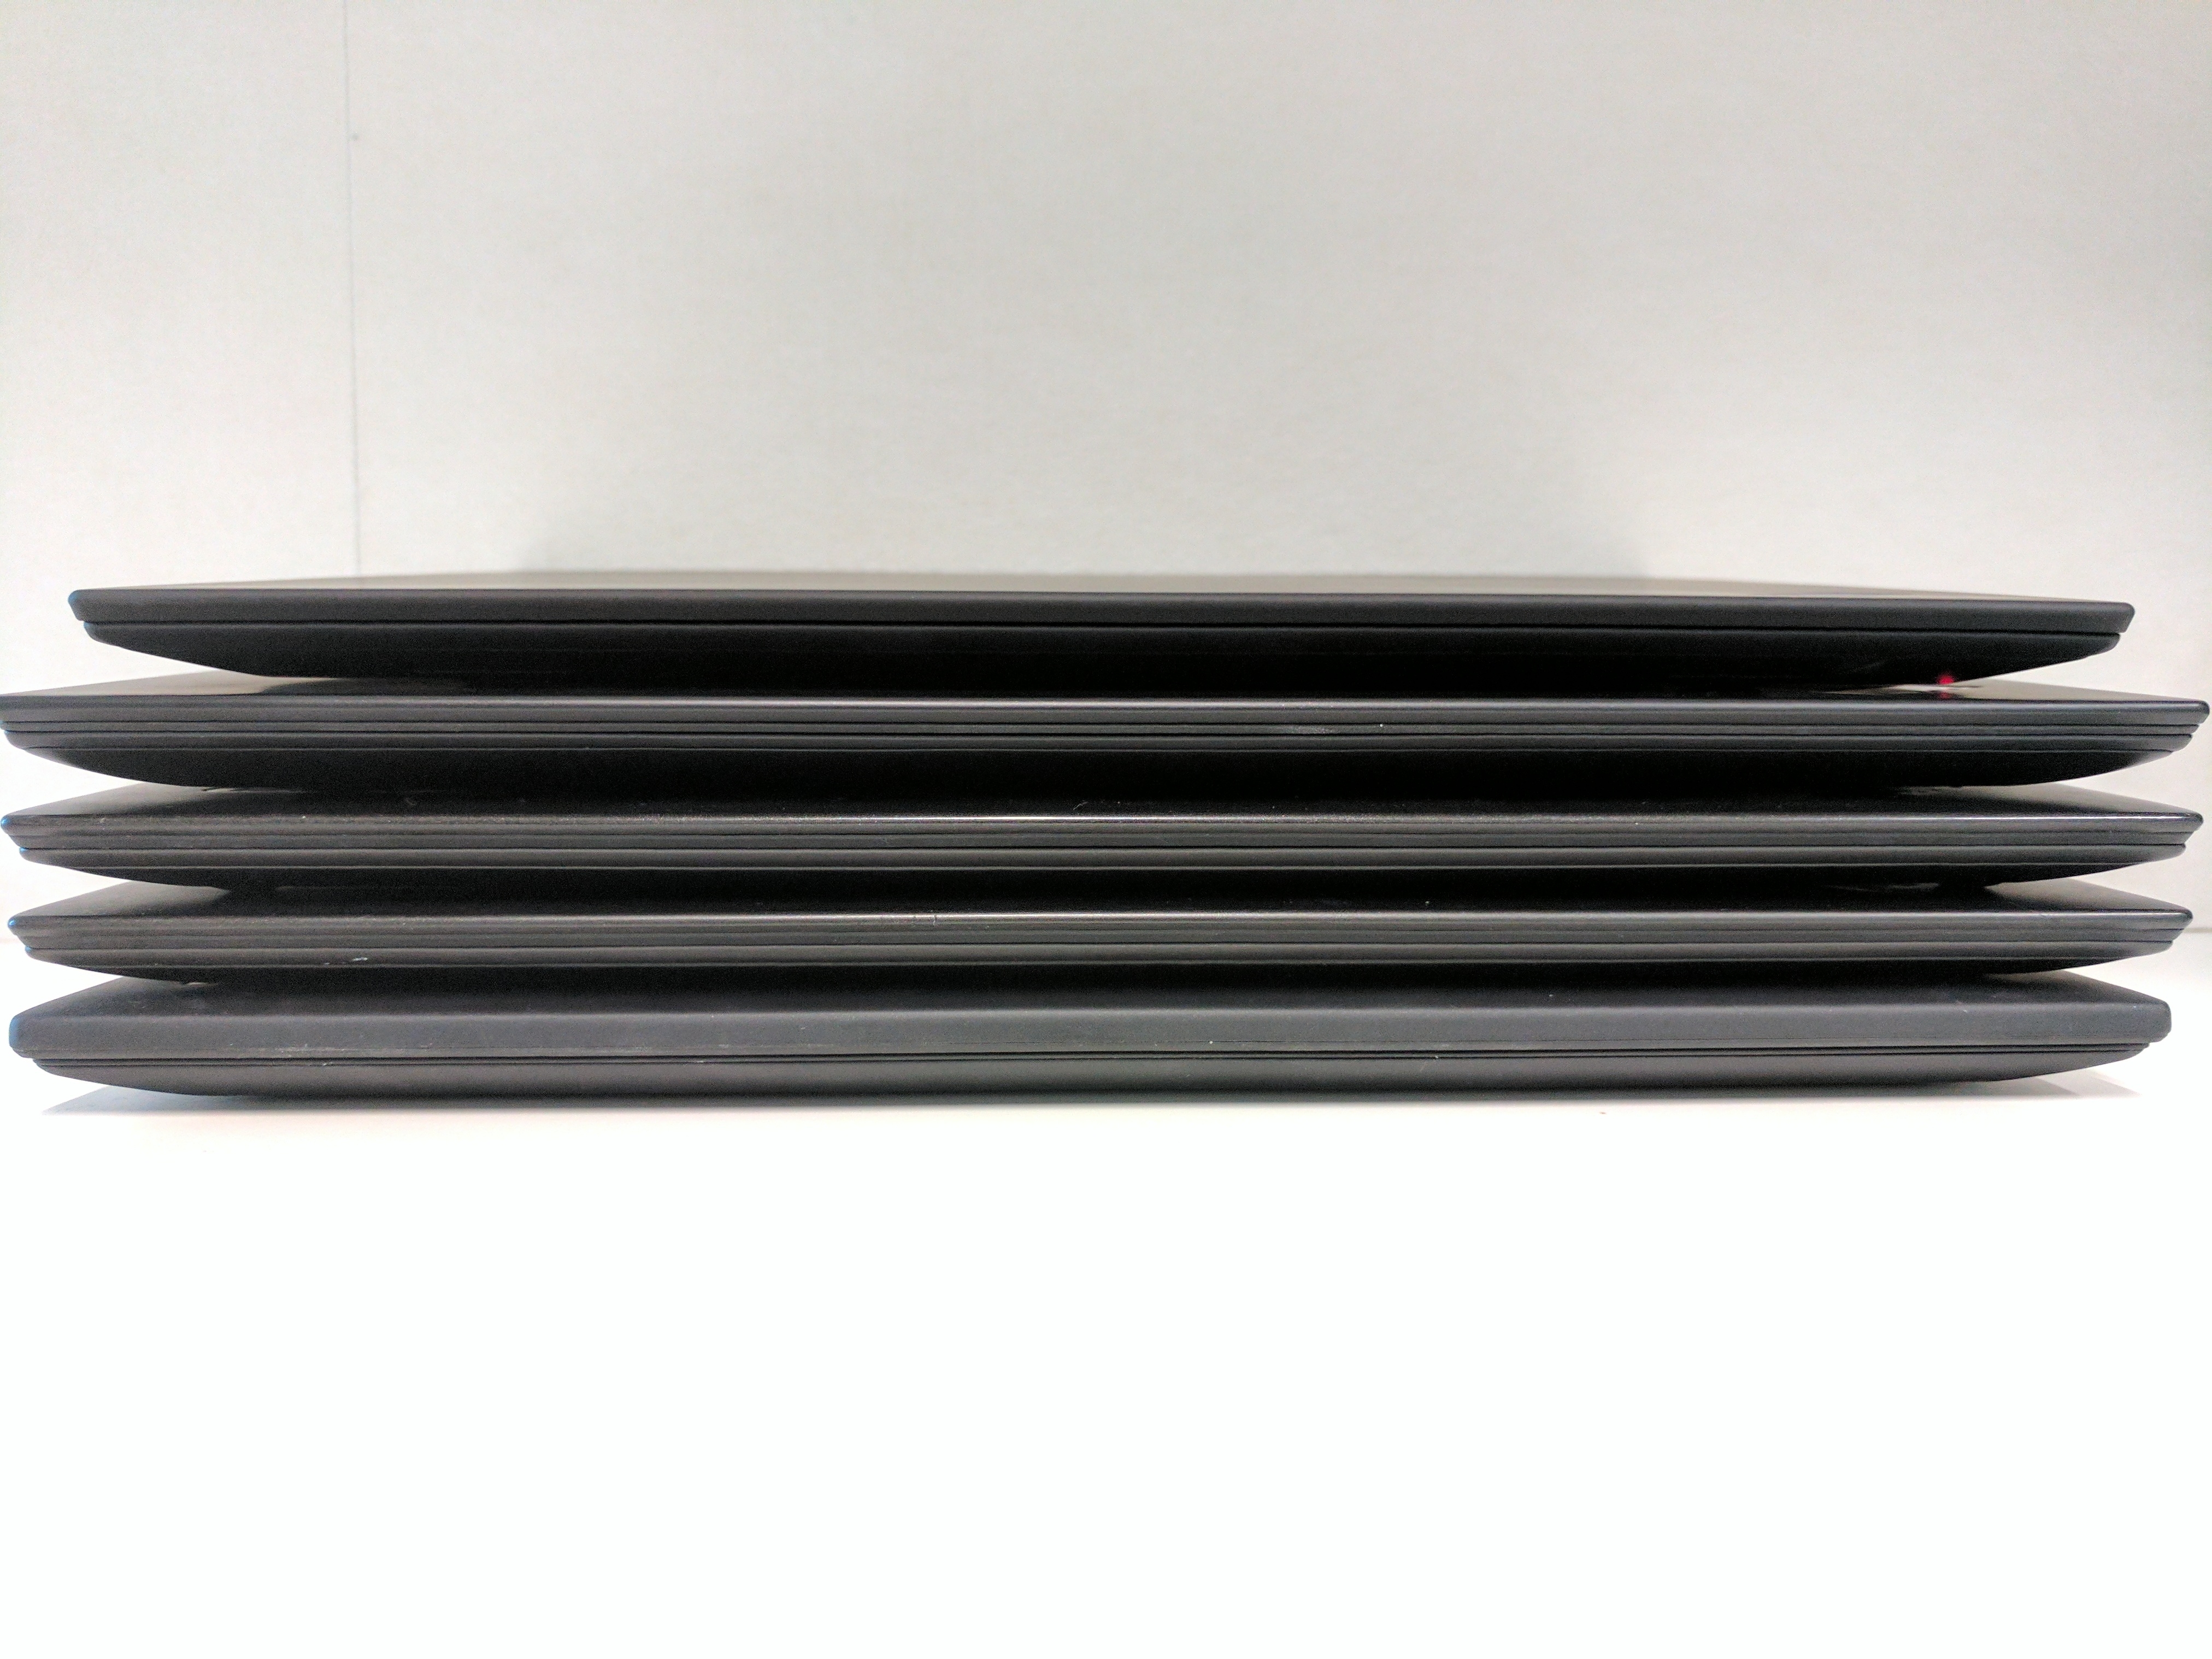
To show what ports are available on each model, and comparing size/style, here’s some photos from each side of the laptops stacked together, oldest on bottom to newest on top (Gen 1 on bottom…). Note that I had to use an X1 Yoga for the 4th gen position, the only visible difference is the stylus, power and the volume controls on the right hand side, which are missing from the Carbon (separate photo below). You can see the vast size difference of the Gen 5 on top:


Front view

Left side view


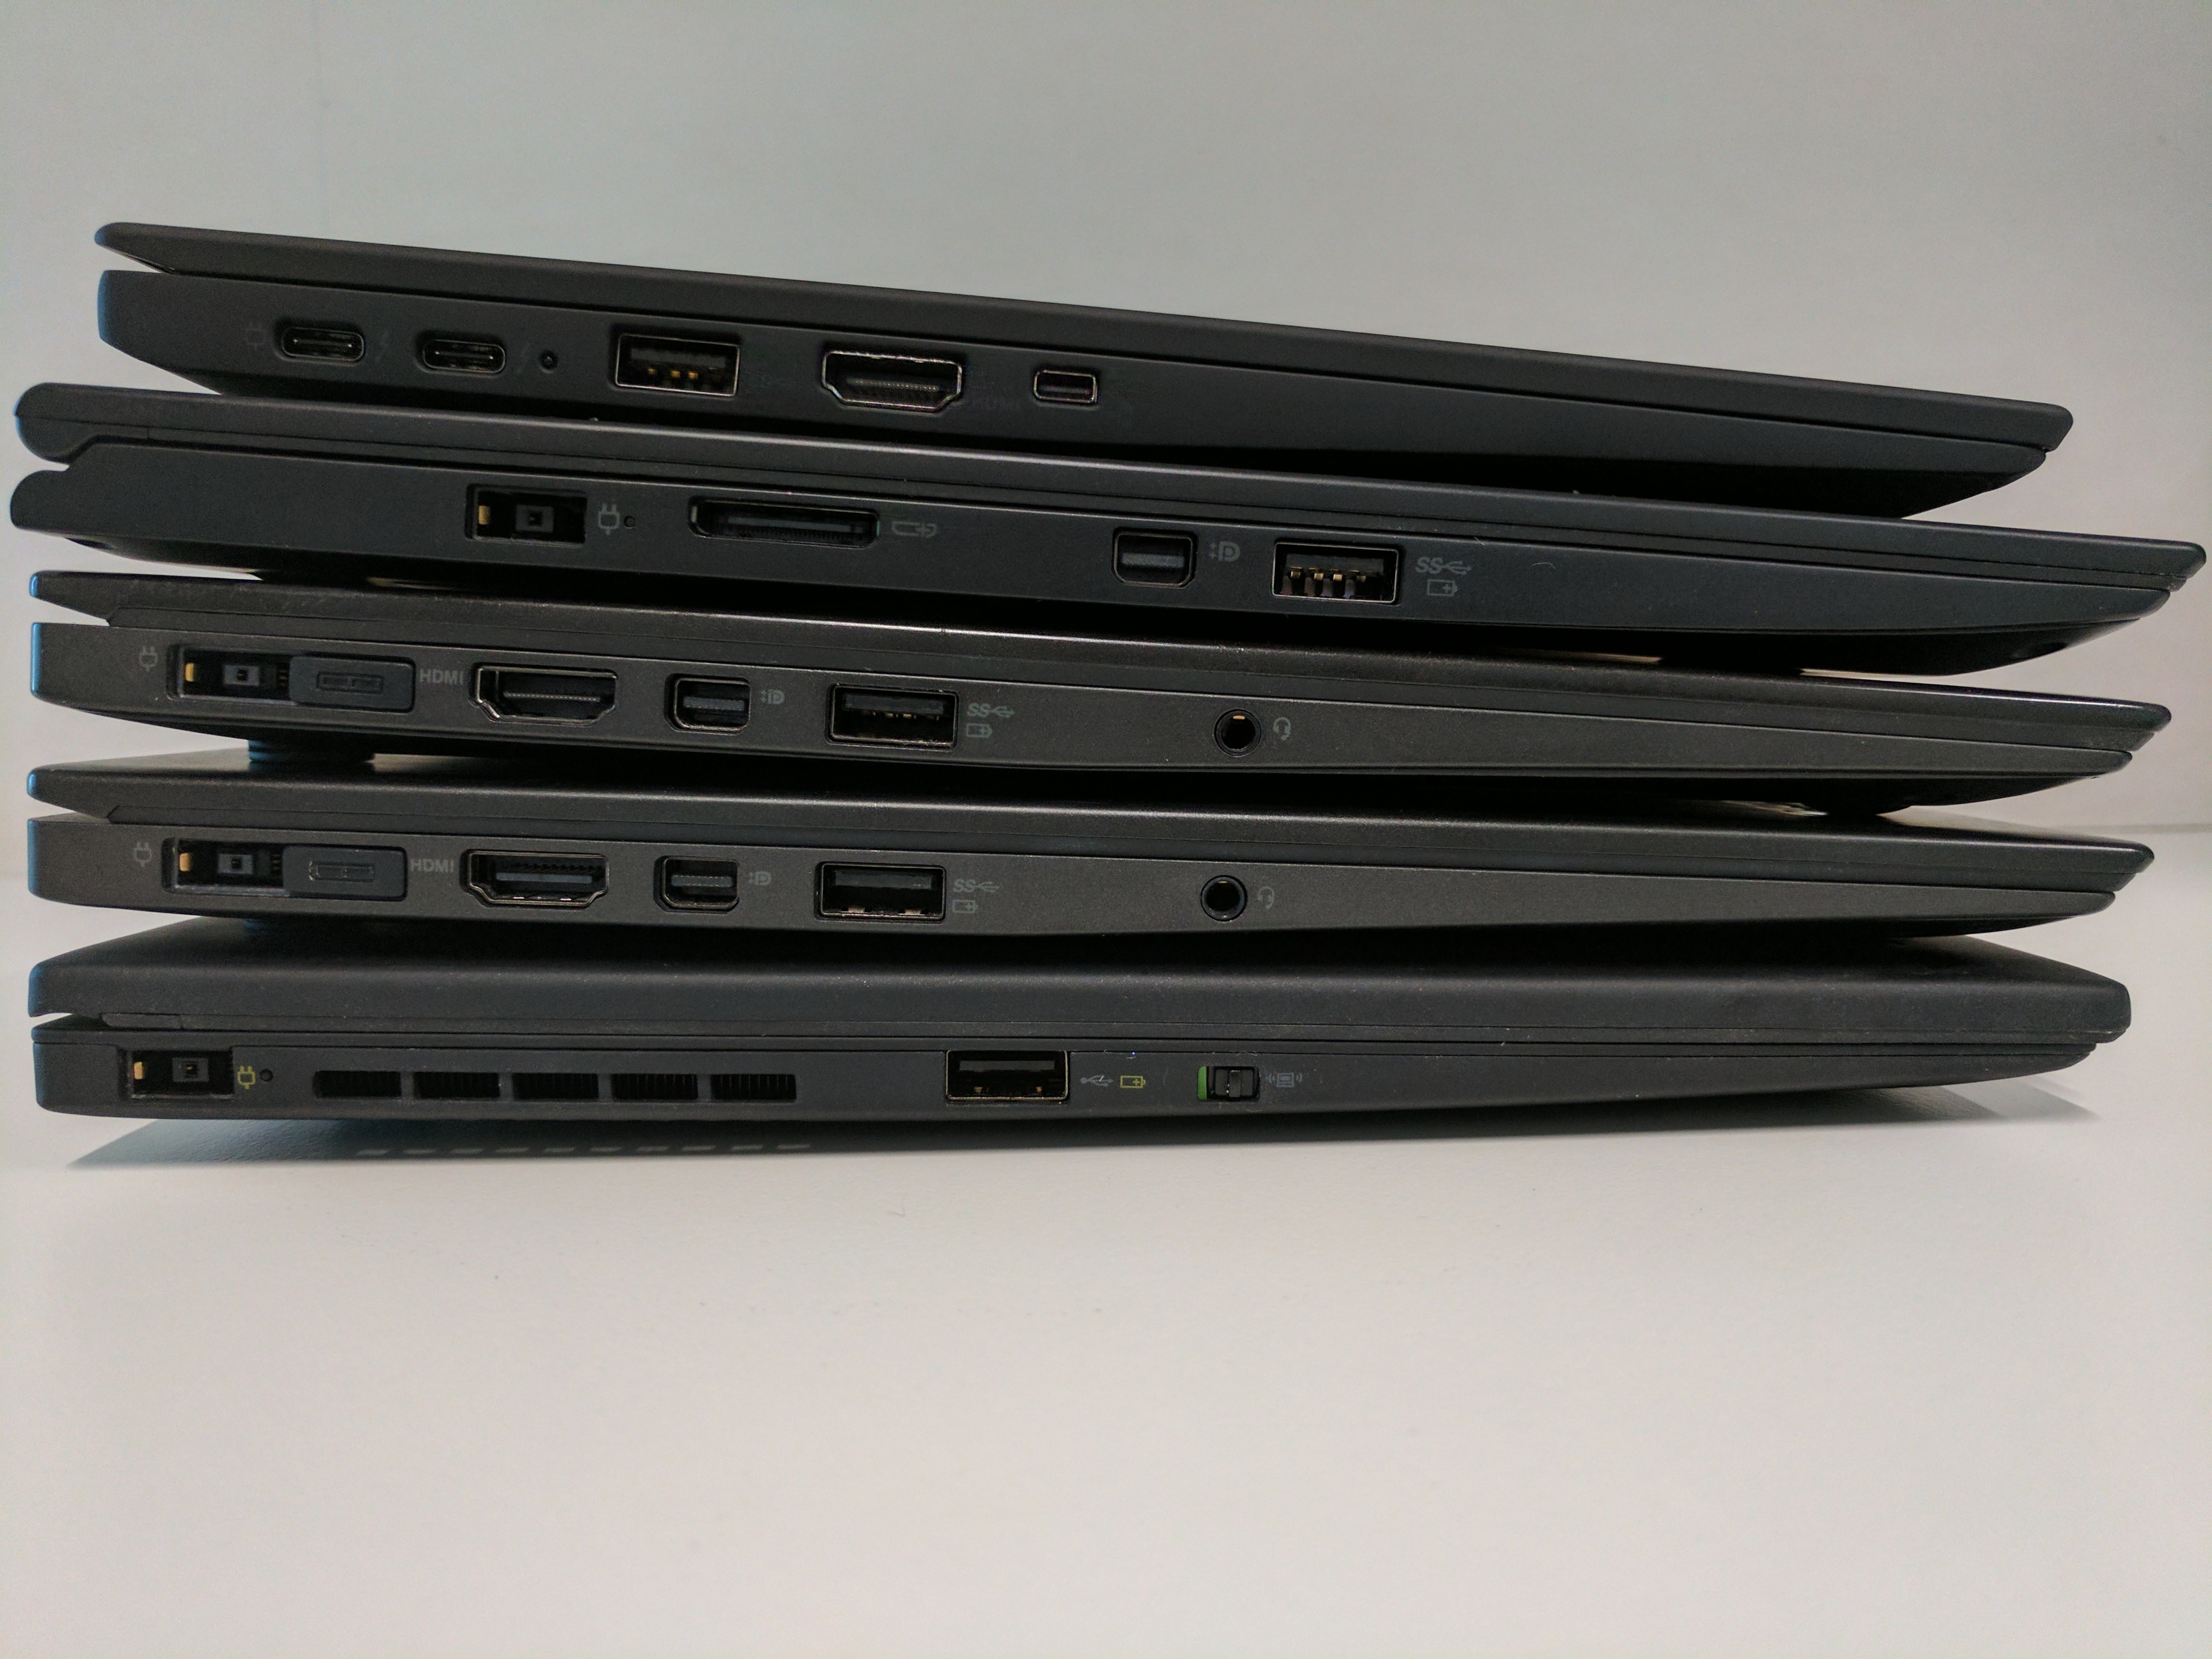
Right side view (note 4th Gen shouldn’t have stylus, power or volume but rest is identical, see below – X1 Yoga used)

Back view

X1 Carbon Gen 4 Right side view (Thanks again Jon Olafsson for these shots!)

Summary

There are many other areas I haven’t covered – such as all three models have a backlit keyboard which is great in the dark. The first 4 gens have RapidCharge technology, meaning you’ll get about 80% of your charge back in 35 minutes. The 5th gen takes up to an hour, which seems to be due to the Thunderbolt changeover. The screens on all options are high quality with great viewing angles and you won’t find much difference between each one.

It’s hard to say which one you should pick – but hopefully this article lays out the differences to be aware of, to help you decide. Price should be a big factor in this, if you have to go one year older but it’s a lot cheaper, it may be the better choice for you.

The X1 Carbon has a great reputation of being a sturdy and reliable business laptop – you’ll pay a premium for having this sort of quality, and is on par price wise with similar offerings from other vendors.

Note: These laptops were on loan or borrowed from various sources (including Lenovo) and returned. This is not a sponsored or paid for post.

Viewing Mbox Files On Windows

A MBOX file is similar to a PST file, in that it contains a collection of emails. PSTs will be familiar to those of us in the Windows world, as it’s one of the old formats Outlook will use.

(Side note: PSTs are bad, but they do function well as a way of transporting a large chunk of mail from one place to another).

MBOX is the Unix version of PSTs. Google also uses this for Gmail, so if you run an export job, you’ll end up with a MBOX file. Microsoft Outlook doesn’t support this format though – so if you’re sent one, how do you view the contents?

If you start Googling, you’ll come across a bunch of ‘free’ viewers and converters. Most of these are free in the demo sense, and will only view or covert 20ish emails.

I eventually found these two free solutions and tested that they worked; if you find any others feel free to share.


Windows Mbox Viewer

This is a free, open source viewer of MBOX files. There’s no installer, just launch the exe, open your MBOX file and you’ll get a simple list of emails and can view the contents. Beyond being able to do searches, the program doesn’t do anything else. This is a great, simple solution if you just want to view the contents of the MBOX file. If you have Outlook installed, double clicking on an email will open it in Outlook, which can then be saved/printed.

Thunderbird

This is also completely free, from Mozilla. Here is a great set of instructions on how to configure Thunderbird to be able to read your MBOX file, but there’s a few more steps involved. Once Thunderbird can see them, you have a lot more options. The emails can be synced to another mail server, or you can simply select emails and save them out. They’ll be saved in the EML format, which Outlook will then recognise. More information about importing and exporting is available here.


I never found completely free software to convert from MBOX to PST, so if you really need that functionality, it might be time to take out the credit card and pay a hard working developer!

Azure AD B2B PowerShell Invites

I’ve written about Azure AD B2B before, as well as then giving those invited users access to SharePoint Online, but there’s been a lot of changes since I started using it. Have a read of my original article if you’re interested to see how I’m using B2B and why.

Azure AD B2B is still in preview, but in Feb 2017 a bunch of improvements were added. Part of these changes were around using the new Azure portal rather than the Classic Portal, and with that is the removal of inviting users via CSV file and uploading it to Azure AD. This was exactly the way I was using it, so I had to change to one of the newer methods.

Although CSV support is gone, it’s been replaced by PowerShell which can just call the same CSV file being used before, so it’s not a huge change. There’s a PowerShell example on this technet page which shows how to do it. There is a catch though, the ability to add the user to groups as part of the import is gone.

The other big change that impacted me was the invitation emails. This is the email that gets sent to the recipient when being invited – it was originally a plain text email from a generic Microsoft address, but it’s now changed to a much more professional looking email. The catch with this is, rather than coming from a generic Microsoft email account, it now comes from the user that sends the invites out. I found this out the hard way when invited parties started seeing my details and photo with the invite!

There’s four approaches I can come up with around this new invite method –

1. Leave it as showing the admin user who does the invites (not ideal)

2. Create and use a seperate service account for these invites, so it comes from a generic looking internal email address (quite good)

3. Get the users themselves to send the invites out – by default, all users have access to invite others to their tenant (worst option, users won’t do this themselves, need training and support, can’t automate)

4. Use APIs and send the invites out on behalf of the user (‘best’ option but requires the most work, most complex)

While I look at option 4, option 2 is a good middle ground and will probably do for most companies.

I’ve written and tested the below script, which works on a single user by user basis. This uses just the Azure AD Preview module for PowerShell, which is at version 2.0.0.85 at the time of writing. To use the method mentioned on that page to install, I had to first install Windows Management Framework 5.0.

$group = get-azureadgroup -SearchString "Put your exact search string here" | where {$_.dirsyncenabled -eq $null}
$newuser = New-AzureADMSInvitation -InvitedUserEmailAddress [email protected] -InvitedUserDisplayName "Full Name" -sendinvitationmessage $true -InviteRedirectUrl "http://myapps.microsoft.com"
Add-AzureADGroupMember -objectid $group.objectid -RefObjectId $newuser.InvitedUser.Id

This script requires you to first authenticate against Azure AD with the command connect-azuread : the same way you’d use connect-msol for Office 365. More on how to automate that part in an upcoming blog post.

I’ve written this on the basis that you already have a group to add the guest user into, which gives them the permissions required after being invited into your Azure AD tenant. It’s also more a proof of concept script, which shows how to automate these steps enough to then be able to do what you want with it – such as wrap it around a ‘for each’ and feed multiple users into it.

The first thing the script does is get the group name. As objects in Azure AD don’t have to have unique names like on-prem Active Directory, this script will fail if it finds multiple results the same. It’s also making sure the result that comes back is only a cloud based group, because you can only add B2B invited users into Azure AD groups (not ones synced from on-prem).

Next it will send out the invite to the user. This is the important part. If you don’t want an email to go out, you can change the -sendinvitationmessage value to $false.

Finally we’re adding the invited user into the group by ObjectIDs of each object – straight forward.

—-

The end result is a user who will be able to accept their invite, log in and have access to whatever they need to. Note that the way I do this is by having an app and advertising it to the group that also gives permissions to SharePoint Online, so they’ll see the single link on their myapps.microsoft.com page.

If you’re mucking about with Azure AD B2B this should give you somewhere to start. The Microsoft Technet pages for Azure AD are very comprehensive now as well as being easy to read, so check them out.

If you have any questions on Azure AD B2B feel free to ask!

Update 23rd August 2017

I’ve now gotten around to making a mass invite script. I used Eric Schrader’s script, and made some of my own modifications.

It will pick up a file in the same path as the script called azure_ad_b2b.csv which needs to be comma delimited with just “InvitedUserEmailAddress,Name”

It will also prompt for the group name which you want to add invitees to, and bomb out if you get more or less than 1 result (because display names aren’t unique fields in Office 365)

Another prompt is for the project URL, which is where you want invitees to be sent to (which for me, is usually a SharePoint Online site). It’s also set to send the invites out from a generic service account, so change “[email protected]” in the send-mailmessage line to whatever you’re sending as. Feel free to ask any questions!

#1.) Install Azure AD PS module – https://www.powershellgallery.com/packages/AzureADPreview

#2.) provide O365 tenant admin cred

$cred = Get-Credential

Connect-AzureAD -Credential $cred

#2.second cred for O365 email account (merge var with above if for non-demo O365 tenant)

$adminemailcred = get-credential [email protected]

$groupname = Read-Host -Prompt 'Input the Group Name to add users to e.g. SharePoint Online XXX Portal External Full'

$project = Read-Host -Prompt 'Input the project name, 1 word e.g. TestSite'

#2.External User Security Group ID

$group = get-azureadgroup -SearchString $groupname | where {$_.dirsyncenabled -eq $null}

if ($group.count -ne 1) {echo "Not Exactly One Group Found"; break}

$projecturl = Read-host -Prompt 'Input the project URL XXX for https://yourdomain.sharepoint.com/XXX'

#3 import CSV, update url and csv location below.

$invitations = import-csv azure_ad_b2b.csv

foreach ($email in $invitations) {

$result= New-AzureADMSInvitation -InvitedUserEmailAddress $email.InvitedUserEmailAddress -InvitedUserDisplayName $email.Name -InviteRedirectUrl $projecturl -InvitedUserMessageInfo $messageInfo -SendInvitationMessage $false

$inviteurl = $result.InviteRedeemUrl

$userid = $result.InvitedUser.Id

#automatically add the new user to your Security Group

Add-AzureADGroupMember -objectid $group.objectid -RefObjectId $userid

#send the user a custom email from your Office 365 tenant. Supports HTML.

Send-MailMessage -To $result.InvitedUserEmailAddress -from [email protected] -Subject ‘Invitation to the $project ’ -Body “<h1>Congrats!</h1><br><strong>This is your invite</strong><br><br>Here:<br>$inviteurl <br>For <strong>help</strong>, contact [email protected]” -BodyAsHtml -smtpserver smtp.office365.com -usessl -Credential $adminemailcred -Port 587

}

Netwrix Sysadmin Blog Awards Finalist (and Winner!)


Netwrix has picked this blog as one of the finalists in it’s blog awards! As their post on this says, the blogs shortlisted “based on the regularity of blog posts, the variety of topics covered and feedback from readers.” For anyone reading this, and particularly those who have supported, shared or commented; I really appreciate you support, and it’s little nods like this that just give another layer of approval and why I do this.

There isn’t too much else to say, but please continue to give feedback, comment (I really enjoy both the ‘this worked for me!’ or the ‘this didn’t work, but this did’ comments) or start your own blog up if you think of something to share – I’m happy to give advice to anyone, or host a guest blog post if you want to give it a try yourself :)

Here’s the list of all the finalists. Check out their blogs as there’s something for everyone there (I’ve had a look through all of them!)

Best Cloud Computing Blog


Best IT Security Blog


Best Tech Tips for System Administrators Blog


Most Humorous Blog


24/7 Tech Support Blog


IT Career Blog


Update 17th March 2017

adamfowlerit.com won it’s category for “Best Tech Tips for System Administrators”! Thanks Netwrix and I’m looking forward to playing with the Samsung VR unit :)

Winners list here

Azure AD Group-Based License Management For Office 365

It’s finally here! At least in public preview…

The ability to allocate Office 365 licenses via groups is now available for everyone to use. This has been a long-awaited feature, up until now licenses have either been applied manually via the portal, or via scripts/3rd party software with logic applied for automation.

Now, you can automatically apply and manage license allocation using whatever logic you like. You can create on-premise AD groups, apply a license set to the groups, and members will be allocated the relevant licensing. If that doesn’t work for you, there’s also cloud based Dynamic Groups which let you use whatever logic you can come up with to add members to the group. You could do it on something like a department name, or use an extension attribute and populate that based on what license you want to allocate.

The above link covers a lot of information about how to deploy this. At the time of writing, I couldn’t get to the Azure Licensing page by searching for the word ‘Licensing’, and instead had to use a direct link: https://portal.azure.com/#blade/Microsoft_AAD_IAM/LicensesMenuBlade/Products

I’ve already deployed it, it seems to work quickly and without issue.


Once you’re done, you’ll need to remove the Office 365 licenses applied manually. This TechNet article shows the commands to use for removal. I used this:

$Users = Get-MsolUser -All | where {$_.isLicensed -eq $true}; $Users | foreach {Set-MsolUserLicense -UserPrincipalName $_.UserPrincipalName -RemoveLicenses "litwareinc:ENTERPRISEPACK"}

This removes licenses from all your users, to be more specific add extra criteria to the first ‘Get-MsolUser’ command. Also note you need to swap ‘litwareinc’ with your tenant ID, and ENTERPRISEPACK with whichever license you’re removing. I’d recommend testing on one account first!

To see what your tenant’s license options are just use:

Get-MsolAccountSku

And you’ll see a list of the license options along with existing allocations.

If you have any questions please comment below.