IT

Strange Old Media

Hi,

Going through an office cleanup, this interesting item was discovered:

media2

media1

I’d never seen one of these before, but it is a Magneto-optical drive which holds 128mb of re-writable data. Quite a cool disk I thought!

We also had a bunch of these:


media3

media4

It’s a storage case for Microfilm from SnapLOCK Hadn’t seen this stuff either!

Not much else to add about these, it’s just nice to see ‘new’ stuff once in a while!

Update: Also found this one!

20130131_125501

It’s a 8 inch floppy, not to be confused with the newer 5 1/4 inch floppy. Read about it here http://en.wikipedia.org/wiki/List_of_floppy_disk_formats#IBM_8-inch_formats

Propagating User Folder Permissions on Exchange

Hi,

This post is consolidating a lot of information I’ve found over the last day. It’s one of those things I’ve done a few times over the last several years, so each time I get to it I need a refresh!

For a user running Outlook connected to an Exchange server, and wanting to give someone else access to a large amount of existing folders, they really only have two options. Painstakingly go through every single folder’s permissions and add the other person, or set the permissions on a top level folder, then create new folders under that, and finally move the emails in. Permissions don’t inherit like normal file folders when you move one, only newly created folders inherit their parent’s permission.

Rather painful for the end user, but from the administration side of things, there are few options.

1. Give the second user full access to the first user’s mailbox. This option is far from ideal, because it’s an all or nothing permission, and it isn’t visible by the end user. They can’t tell who has access to their stuff. It also requires someone with appropriate Exchange privileges to manage and make these changes every time. It’s good for a generic mailbox, or someone who’s left the company etc where there is no particular user to manage the permissions.

Exchange 2003 instructions: http://technet.microsoft.com/en-us/library/aa998707%28v=exchg.65%29.aspx

Exchange 2007 insutrctions: http://technet.microsoft.com/en-us/library/aa996343%28v=exchg.80%29.aspx

Exchange 2010 instructions: http://technet.microsoft.com/en-us/library/aa996343%28v=exchg.141%29.aspx

Exchange 2013 instructions: http://technet.microsoft.com/en-us/library/bb124097.aspx

2. Using either PFDAVAdmin or ExFolders, an administration can use a GUI to connect to a user’s mailbox and apply permissions to a folder, then force propagation of those settings to all child folders. This gives the user visibility and control of the current permissions and future changes, but also will save someone a lot of time from manually doing this.

For Exchange 2000 (sorry if you’re still on this!), Exchange 2003 and 2007, the PFDAVAdmin tool is used, available here: http://www.microsoft.com/en-us/download/details.aspx?id=22427. Keep in mind if you’re on Vista or above you’ll need to manually install Microsoft .Net 1.1. There are some great instructions here on how to do so: http://saranspot.blogspot.com.au/2009/02/installing-dotnet-framework-11-on.html

How to apply the permissions and propegate? This blog post contains great detail, although you can just choose the option of all mailboxes and drill down to the one you’re after rather than worrying about long URLs: http://www.nigelboulton.co.uk/2010/12/delegating-and-propagating-exchange-folder-permissions-using-pfdavadmin/

For Exchange 2010, they change the utility to ExFolders, available here: http://gallery.technet.microsoft.com/office/Exchange-2010-SP1-ExFolders-e6bfd405 . This one can only be run on your Exchange server, read the notes below the download.

Hope that helps anyone looking for a refresh on how to give mailbox permissions or propagate folder permissions!

Removal of Recovery Storage Group

Hi,

Following on from my post here http://www.adamfowlerit.com/2013/01/02/recovery-storage-groups-in-exchange-2007/, once you’re finished with your Recovery Storage Group, you should clean it up. A rather simple process, you start with this Exchange Powershell command:

Remove-MailboxDatabase -identity <Server_Name>\<RSG_Name>\<Database_Name>

This will do the obvious thing of removing the mailbox database. If you can’t remember what you called your Recovery Storage Group, just use the command ‘Get-MailboxDatabase’ and you’ll see all your databases, and if you’ve named the RSG sensibly, you’ll be fine. One thing I ran into was trying this command from a Windows Server 2008 R2 box, while Exchange 2007 was running on Windows Server 2003. It brought up an error saying that I couldn’t remotely do commands from 2008 to 2003, but when I got onto the 2003 box, the database was gone! If you didn’t have this problem, you should get a message stating that you need to manually remove the database file.

The second step is to remove the Storage Group with the following command

Remove-Storagegroup -identity "<Server_Name>\<RSG_Name>"

Again, run ‘get-storagegroup’ to remind yourself of the name. After this, you’ll get a message telling you to remove the log file:

WARNING: The specified storage group has been removed. You must remove the log file located in h:\path\logs from your computer manually if it exists. Specified storage group: exchange\rsg.

Pretty straight forward. If you don’t clean up your RSG, you may have issues with backup software detecting the extra database.

Source: http://technet.microsoft.com/en-us/library/bb125197(v=exchg.80).aspx

SCCM 2012 Right Click Tools and Permissions

Hi,
I ran into some issues getting this working in 2012, so thought I’d share some details about getting this working.

There’s a few variants of the Right Click Tools for System Center Configuration Manager 2012, but the first one I tried didn’t have a right click option for “Application Deployment Evaluation Cycle” which is a rather important one to have. I settled on this one http://myitforum.com/myitforumwp/2012/08/22/configmgr-2012-right-click-tools-update/ called “ConfigMgr 2012 Powershell Right Click Tools”. The other variants are also available here http://myitforum.com/myitforumwp/community/groups/sccm-right-click-tools/docs/.

After downloading and installing, I first discovered the addon didn’t actually install. I needed it on both a Windows Server 2008 R2 box, and a Windows Server 2012 and they both had issues. On 2008, I discovered in the comments of the page I linked before, that the following fix was suggested:

someone gave a quick way to fix this in Powershell 3.0. Just run these commands in powershell and then test it out:
Get-ChildItem “C:\Program Files\SCCMConsoleExtensions” | Unblock-File
Get-ChildItem “C:\Program Files\SCCMConsoleExtensions\PSTools” | Unblock-File

Now the first issue is that Powershell 3.0 isn’t built into Windows Server 2008 R2, so you’ll need to install it, download available here: http://social.technet.microsoft.com/wiki/contents/articles/4725.powershell-v3-guide-en-us.aspx

Once you’ve got that, just run powershell, run the two commands and that seemed to be all I needed to do, the right click tools now worked perfectly.

On the Windows Server 2012 box though, the right click tools came up, but did nothing when any of the options were selected. It already has Powershell 3.0, but running those commands didn’t help. I then thought that re-trying the installer with the right click option ‘Run As Administrator’ would work, but no difference.

As per my “Windows 8 – Easy Admin Access” blogpost, I launched command prompt with those elevated privilidges and installed again. No luck! Finally, I then ran powershell.exe from the elevated command prompt, entered the two Unblock-File commands, and that did work. Keep in mind I even tried the above with the domain administrator account before running the elevated command prompt, so it really demonstrates how different security is in Windows 8 and Windows Server 2012.

Just because you’ve got God level access, and run something with ‘Run as Administrator” doesn’t necessarily mean you’ve got access!

run as

Using Firefox with a Putty SSH tunnel as a SOCKS proxy

Hi,

The reason I wanted to do this one was viewing a site from an American IP address rather than an Australian. I tested this on my Bluehost account, and it worked perfectly. Here are the instructions:

1. Work out how to connect to your server. You’ll need Putty (available at http://www.chiark.greenend.org.uk/~sgtatham/putty/) – from the Session screen, put in your hostname, most likely port 22 for SSH, make sure SSH is selected as the connection type and click ‘Open’ at the bottom of the screen. If you can log in to that, then the SSH component works and you’re good to go for the rest of this.

2. From Putty, go down to Connection > SSH > Tunnels. From this area, add in a source port (I’ve chosen 9870 but this can be any unused port), and choose ‘Dynamic’. Then click ‘Add’ and you’ll get an entry under “Forwarded Ports”:


3. Go back to Session and connect to SSH. You can save your session to load later rather than retyping the details:

putty2
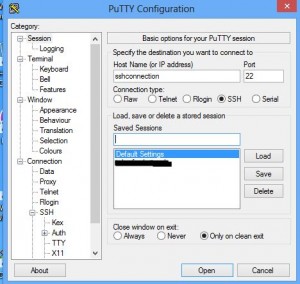
4. Click “Open” and log onto your SSH session. You only need to log on with your credentials and get to a bash prompt.

5. Open Firefox, and go to the website http://whatismyip.com – take note of your external IP address, because this should change once you’re tunnelling through SSH.

6. In Firefox, press the ‘alt’ key to bring up the top menu and go into Tools > Options. Under the “Advanced” area, go to the “Network” tab and in the “Connection” area click the “Settings” button.

firefox17. Choose the “Manual proxy configuration” radio button, and under SOCKS Host enter “127.0.0.1” and the port you entered into Putty (in my case it’s 9870). Make sure SOCKS v5 is selected.

firefox2

8. Press OK twice to get back to the main view of the Firefox Browser. Try again to get to http://whatismyip.com – if all is working, you’ll see a different IP address which is from the server you’re SSH’d to. If something isn’t configured correctly, you’ll more likely see a browser error like “The proxy server is refusing connections”.

That’s it! Handy for Australians to get access to different web content and pricing.

Update: BobGrrl on twitter has mentioned another two options, free but requiring someone you know to help you at the other end. http://openvpn.net is where you can get it, so a good free opensource solution pending you’re nice enough to someone in another country!

If you want to do this with BlueHost yourself, sign up here:

There’s a bunch of other stuff you get, not just proxy access :)

Update 19/11/2013: This has been tested under Windows 8.1 and worked perfectly. If you do any of the above settings wrong (like putting in 127.0.0.1 as your HTTP proxy rather than SOCKS Host) it probably won’t work. Also make sure your forwarded port from the very first step is still there, if you close putty and re-open it may not remember those settings.