Synology Active Backup for Business Review and Walkthrough

Previously I’d already covered Synology’s Microsoft 365 Backup software which I was a big fan of, for simplicity of use and an incredibly cheap price point for a small to medium business as a Microsoft 365 data backup solution.

This time, I’m looking at Synology Active Backup for Business on their new DiskStation 1621xs+. Just like Microsoft 365 Backup, Active Backup for Business is free as long as you have a supported DiskStation model:

Applied Models

  • 21 series:DS1621xs+, DS1621+, DVA3221
  • 20 series:FS6400, FS3600, FS3400, RS820RP+, RS820+, DS1520+, DS920+, DS720+, DS620slim, DS420+, DS220+, SA3600, SA3400, SA3200D
  • 19 series:RS1619xs+, RS1219+, DS2419+, DS1819+, DS1019+, DVA3219
  • 18 series:FS1018, RS3618xs, RS2818RP+, RS2418RP+, RS2418+, RS818RP+, RS818+, DS3018xs, DS1618+, DS918+, DS718+, DS418play, DS218+
  • 17 series:FS3017, FS2017, RS18017xs+, RS4017xs+, RS3617xs+, RS3617RPxs, RS3617xs, DS3617xs, DS1817+, DS1517+
  • 16 series:RS18016xs+, RS2416RP+, RS2416+, DS916+, DS716+, DS716+II, DS416play, DS216+, DS216+II
  • 15 series:RS815RP+, RS815+, RC18015xs+, DS3615xs, DS2415+, DS1815+, DS1515+, DS415+
  • 14 series:RS3614xs+, RS3614RPxs, RS3614xs, RS2414RP+, RS2414+, RS814RP+, RS814+
  • 13 series:RS10613xs+, RS3413xs+, DS2413+, DS1813+, DS1513+, DS713+
  • 12 series:RS3412RPxs, RS3412xs, RS2212RP+, RS2212+, RS812RP+, RS812+, DS3612xs, DS1812+, DS1512+, DS712+, DS412+
  • 11 series:RS3411RPxs, RS3411xs, RS2211RP+, RS2211+, DS3611xs, DS2411+, DS1511+, DS411+, DS411+II

The support goes a long way back years wise, which is great to see. They have a comprehensive overview of this application and it’s abilities, but I’ll cover it all more briefly here while sharing my experience setting each type of backup up.

Installing the software on a Synology DiskStation is easily done via Package Center and a very quick activation process that requires a free Synology account:

After activating, you’ll immediately see the overview screen. At a glance, it gives a good idea on the sorts of things you can back up:

PC and Physical Server backups

Backing up a physical PC or Server is pretty easy, and the wizard takes you through the steps. Windows 7 SP1 and above is supported, as is Windows Server 2008 R2 and above, and needs the ‘Synology Active Backup for Business Agent’ installed. After a next, next finish, install, you’ll need to specify the IP/name of your DiskStation, and username/password:

After connecting and confirming the details, the PC is registered against Active Backup for Business, and the agent continues to run in the tray:

The agent will show when you last backed up, and if a backup is currently running:

No backups will run yet though, because we need to create a backup task back on Active Backup for Business. Again, a wizard will take you through this and let you choose what options you’d like for backup. I’m going to just back up everything, with the data compression and encryption options (which are default)

You then define when you want your backup to run – manually, or on a schedule:

I do quite like some of the options here – backup by event of screen locked or signing out is a nice way of making sure it doesn’t interrupt someone using the PC and slow things down while they’re actually working. Also having backup windows, so you can block out the working day if needed.

Next is the retention policy, a good way of reducing space taken – is there a difference between a backup 5 months ago vs 5 months and 1 day? Probably not, and very unlikely that you had something worth restoring on your PC only for 1 day.

At the end of the wizard and a summary screen, you have the option to back up now. I kicked this off, and the agent immediately showed the progress and events related to backing up.

This was a really easy and painless setup to back up a PC, but what about restoring? You can either create recovery media for a full restore, or you can use the Restore Portal to navigate through backups and pick what you’d like to restore:

The bottom time line lets you pick from what point in time you’d like to restore, with a dot showing each available time point.

Then, you can navigate through the disk you need, and go through the folders which match the file structure at the time of backup. Once you’re on the single file, multiple files or folder you want to restore, you can choose the “Restore” option to put the files back in their original location, or somewhere else, and decide if you want to automatically overwrite existing files or not.

Download however, will just download the file you selected like any other browser based download, or multiple files will come through as a single ZIP file.

File Server Backups

If you don’t want, or can’t have an agent on a file share, you can instead remotely back up via SMB or rsync:

After entering the remote server details:

It will verify they work, then let you set up a task:

The options are Multi-versioned, Mirroring and Incremental. They cover the different scenarios you might want to use – Multi-versions will take up the most space, where mirroring can only ever be as big as the source files, and incremental is half way between the two, without the versioning component:

You can then choose what to back up in the file share:

And then finish creating your task by giving it a name, telling where to backup the files to locally, and set a schedule.

The other option you’ll notice here is ‘Enable CSS for SMB File Shares’. If the source share supports this, then the backup can be taken without interruption to access of these files, which has been fairly standard for a while – so turn this on if you can.

The restore process is pretty much the same as PC / Physical Server, so I won’t go into detail on that part.

Virtual Machine

Both VMWare Hypervisor and Microsoft Hyper-V are supported Virtual Machine platforms. As I haven’t touched VMware for years, we’ll look at Hyper-V only. It’s worth noting that cross platform restores are supported – you can restore a Hyper-V VM to VMware vSphere too.

Creating a Hyper-V backup is again an easy process:

First, you’ll need to put in the Hyper-V Host details. If you’re trying to back up VMs on a Windows 10 laptop you have, there’s a few small requirements:

Set up WinRM by running ‘WinRM QuickConfig’ in an elevated command prompt. You’ll need to make sure none of your network connections are set to ‘Public’.

Have a local admin account ready to use, and allow SMB2 through the Windows Firewall by allowing ‘File and Printer Sharing’ on Private networks.

The Hyper-V Backup Task wizard will give you hints as to where you might be stuck, and at the end you’ll have your host listed:

The Hyper-V Virtual Machines will then be automatically detected and listed, but they’re not configured for backup yet – we need another task. Clicking ‘Create Task’ will start by asking you where you want your backups:

Then you can choose the Hyper-V VMs to back up:

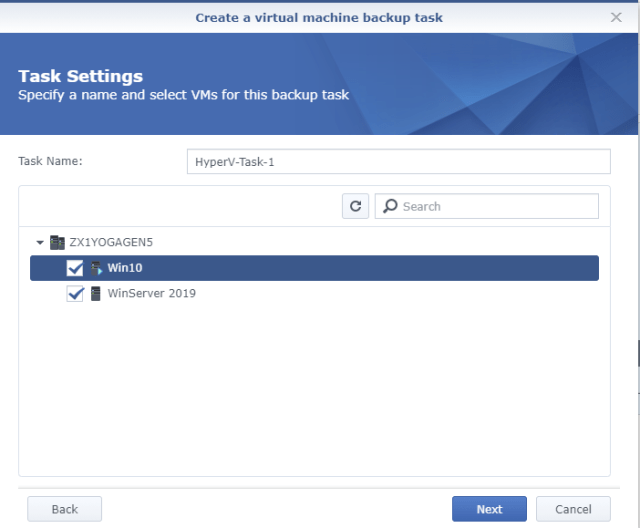
One selecting, we have several settings we can configure:

The default options are shown.

Maximum quantity of concurrent backup device(s) can be up to 10.

Enable Changed Block Tracking – Only transfer blocks that have changed since the last backup, rather than all blocks to reduce backup times drastically.

Enable application-aware backup – Use Volume Shadow Copy to ensure consistency with backups

Enable data transfer compression – Suggested for slow networks to improve transfer rates

Enable data transfer encryption – Self explanatory :)

Enable source datastore usage detection – to prevent running out of space

Enable backup verification – Checks the backup when complete

Once you’ve selected the options you want, you’ll see the familiar Schedule Backup Task window, retention policies etc:

I always prefer an agentless backup where possible, so it was good to see no agent was required to backup Hyper-V VMs.

Backing up a Windows Server 2019 VM was rather quick – especially since the laptop hosting the VM was connected via Wifi.

Restoring is again pretty simple, you can navigate to the location of the backups and see a copy of the vhdx for each VM, with other files I expect keep other incremental change data:

The Restore Wizard starts by letting you pick witch platform you’re restoring to- Synolgoy Virtual Machine Manager gives extended options for management and recovery and is recommended for flexibility in production environments. For a lab, you should be able to get away without it:

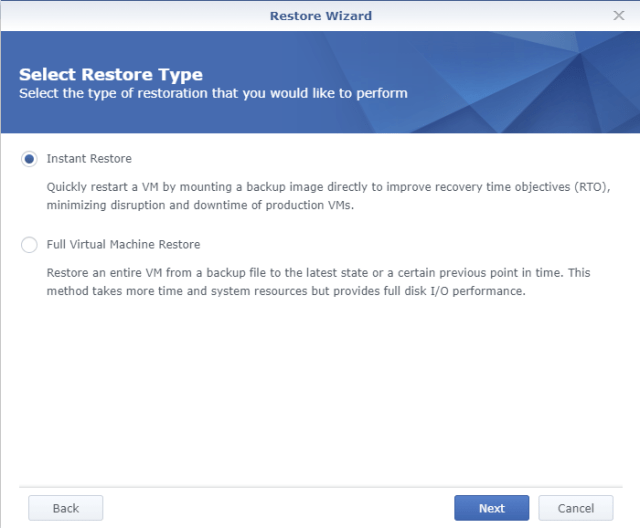
Restore Type – Instant Restore and Full Virtual Machine Restore are the two choices:

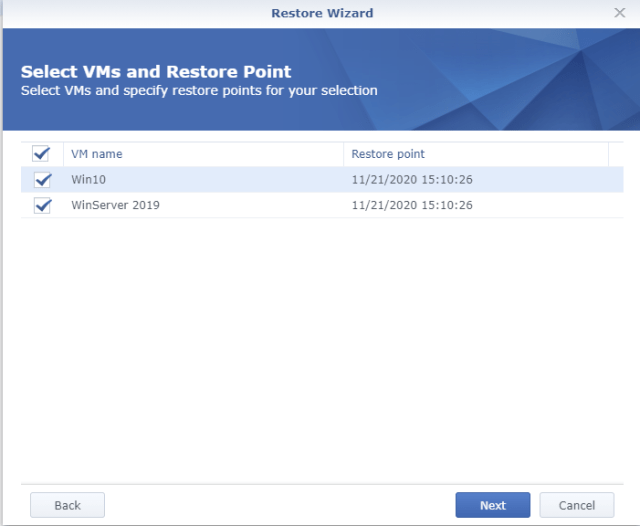
You can then pick which VMs you want to restore and which restore points:

Restore Mode lets you choose if you’re replacing the current live VM, or restoring to a different location as a copy:

Finally, the summary screen with the option of automatically powering on the VM when complete.

Phew! That’s the runthrough of the backup types and restore options Active Backup for Business supports.

The dashboard gives a great ‘at a glance’ overview of everything going on, and we even have de-duplication of data! This is what it looks like with some real data in it, compared to the first screenshot of this post:

There’s a bunch of other first party Synology apps available too:

Plus third party apps:

And with solutions like Docker, you can use your Synolgoy to host many other solutions available in containers, and run them off this little black box.

I’ll say the same thing about Synology Active Backup for Business I did in my Synology Microsoft 365 Backup Review – this is pretty impressive for ‘free’. Yes, you have to buy the Synology DiskStation itself, and you’ll need disks, but that’s it. Even if you use it as a single nightly backup for having a local and quickly accessible restore point to provide as much business continuity as possible, it’s an entire solution at an incredibly cheap price point.

Because you can do both Microsoft 365 data AND Hyper-V VMs on this single device, it should be an option that any small to medium business should investigate. The interface is easy to use, the logs show detailed information about what’s going on – and even for a home business setup, it’s very much a set and forget event.

Cloud Voicemail and Out of Office Greetings

Earlier this year, Microsoft changed how voicemail worked for Skype for Business on-premises customers. There was little difference to end users when Unified Messaging changed to Cloud Voicemail, but it did break a few Auto Attendant options for those not in the cloud.

At the time I remember it being rather difficult to find out information on, and the good contacts I had at vendors also struggled to gather intel on how the change would go.

In the end, the migration happened and it was thankfully a non-event. What I didn’t realise at the time, was that it introduced a new portal for Voicemail settings at https://admin1.online.lync.com/lscp/usp/voicemail (which has slight variations where you are in the world, for Australia it’s https://admin1au.online.lync.com/lscp/usp/voicemail – but the links seem to redirect to where they need to go) and there’s a few interesting settings:

The Call Answer Rules section (Choose how you want your calls to be handled when they reach the voicemail service) lets you pick what happens when someone hears your voicemail, including the last option ‘Play greeting, then allow the caller to recording a message or transfer to the target user’. If you set this, you can then enter the number you want calls to go to if someone does press ‘0’ – such as Reception, or your mobile phone. The default setting is ‘Play greeting, then allow the caller to record a message’.

The Prompt Language section (Changing this setting will change the greeting prompt language) will change the language and accent of the greeting – so if you’d like them to sound Australian, you can choose that.

The Configure Out of Office greeting section (Customize an Out of Office greeting message, and choose to play it to callers all the time, based on your Outlook auto-reply status, or calendar OOF status) was the one I liked the most. It can sync with your mailbox to know when you’re Out of Office via your current Outlook status (either with an autoreply, or just in a meeting with the status ‘Out of Office’), and when true, give a different message to the caller saying you’re out of the office.

There’s also another option Text-to-Speech Customized Greeting Option (Customize your Text-to-speech greeting message) that lets you customise the generic Out of Office greeting to whatever you like. Although you can only type your greeting message, the text-to-speech works really well and sounds natural.

To me, this is great. I can set a generic ‘I’m out of the office, please call X on this number’ which only plays when I’m actually out of the office. If I’m not, then a caller will hear my standard greeting and can leave a message, instead of hassling co-workers. I don’t have to remember to set it or change it, it just applies if I do the right thing in my Outlook calendar.

If you’ve got Cloud Voicemail; which you should if you’re on Skype for Business, Skype for Business Online, or Microsoft Teams as your phone system, check it out and save yourself some time from changing your voicemail when you go on leave, or just have a meeting when you’re not around.

App & Browser Control Warning in Windows 10 2004

The setting to block potentially unwanted apps is turned off. Your device may be vulnerable

After upgrading to Windows 10 2004, I noticed an alert in Windows Defender. It was alerting that something needed to be turned on, and I wondered what as I needed to do this in Group Policy for the entire organisation.

Clicking the area around the ‘turn on’ button takes you to the App & browser control – containing another ‘Turn on’.

Go into the ‘Reputation-based protection settings’ link and there’s more info:

Aha! an option that’s not on – Block downloads. This is actually a Microsoft Edge setting which you can toggle, and will at the same time tick ‘Block downloads’:

I couldn’t find where this was set in Group Policy, so used Procmon to work out what was changing with that toggle. I ended up working out it was in the registery: HKEY_CURRENT_USER\SOFTWARE\Microsoft\Edge\SmartScreenPuaEnabled and setting the default value to 1:

Great, now I knew what was changing, I could work backwards. Using GPSearch I looked for “SmartScreenPuaEnabled” and came back with

Configure Microsoft Defender SmartScreen to block potentially unwanted apps – User Configuration\Administrative Templates\Microsoft Edge\SmartScreen settings\

I didn’t have this Group Policy setting, so checked I had the latest ADMX files loaded for Windows 10 2004 – which I did, and they include templates for the Chromium based Microsoft Edge.

What I then discovered (or remembered!) was that there were separate ADMX files to get for Microsoft Edge, updated with each release. Downloading and loading these into my central repository brought in the “Configure Microsoft Defender SmartScreen to block potentially unwanted apps” setting I wanted. Enabling that, running a gpupdate set the value to what I wanted, and cleared the Microsoft Defender alert.

Long story short – if you’re still using Group Policy like me, you may want to get into the habit of updating your ADMX files for Microsoft Edge more frequently than your Windows 10 builds – Microsoft releases major versions of Edge every 6 weeks.

Chromecast with Google TV Review

Google do some things well, and some other things not so well – those get abandoned reasonably quickly for the most part. One of the areas they’ve excelled at in recent times, is leveraging their Android platform to provide a decent Smart TV experience. So much so, that most TVs these days come with Google TV built into it, and a nice big Google Play button on the TV remote.

In a move that will probably frustrate most TV manufacturers, Google has added this same Google TV experience into their latest Chromecast devices. For $99AU, you can buy a Chromecast with Google TV device and plug it into a HDMI port of your TV, and plug the other end into the wall via USB charger to make any TV, smart.

To reiterate – this can now be a standalone device for streaming media, that doesn’t need your phone or anything else to kick it off.

Personally I’ve been plugging old laptops into TVs and using wireless keyboards to provide a similar experience. In some ways, it’s much nicer to have a full version of Windows available along with a keyboard to be able to alternate between media watching device and computer monitor, but using a keyboard is still a clunky experience for sitting on a couch and just wanting to watch some Netflix.

Coming in three colours (which have fancy names, but they’re white, pale blue and pale pink), I started with a pale blue. The device is still quite small and thin and has the hard wired HDMI cable at one end, and the USB-C port at the other – cable and power point plug were included.

If I buy more, I’ll get one of each colour, because the remote that comes with it is also coloured meaning you know which remote goes with which TV.

It’s a smaller remote that takes 2xAAA batteries (which also came with the device), but I wouldn’t say it’s too small or too light. The top part is a 4 way directional pad with selection button in the middle, with back, Google Assitant, home, mute, YouTube, Netflix, Power and Input toggle buttons available.

The side of the remote also has a volume up/down, and as part of the initial setup you choose your TV and press buttons to make sure it’s working as desinged. My TV brand wasn’t listed (FFalcon), but since it’s an updated name for TCL, I chose that and it worked.

One weird message I had when setting up was this: “This Chromecast was manufactured for a different country, and may not be compatible with your Wi-Fi network.” I bought this directly from Google, and others also had the same message. I’m guessing it was built for the USA which has different Wi-Fi requirements, but it hopefully won’t be an issue here (even though Google couldn’t get Wi-Fi right on their Nest Mini device).

Back on the remote, once I’d finished setting up and started to play around I found the throw distance of the remote for IR functions (such as volume) to the TV was quite poor. Within about 1.5m it worked perfectly, and beyond that it just didn’t work. Maybe it’s just my TV, but it was frustrating. For volume, you do have the choice of having the buttons control the TV volume or the Chromecast device volume, so if you were solely using the TV with that it would make sense to increase the TV’s volume and change to that – but if you have other devices you switch to, they’ll of course come out a lot louder. I ended up using the TV remote for volume instead.

The display looks as you’d expect, a list of apps, with TV show suggestions and access to the Google TV app store. You can add/install a bunch of other apps, including SteamLink which will let you stream games from your PC. Combine that with a bluetooth paired controller to the Chromecast device, and you’ve got an easy gaming setup straight out of your big TV.

I don’t need all the other fluff that Google provide, and surprisingly they’ve added an option where you can turn it off and just be in ‘app mode’. You still see a TV show suggestion (including Disney shows, despite uninstalling the app and restarting the unit), but it’s much cleaner:

I tried out Plex and it worked perfectly!

It’s cheap for what it provides, and it runs really fast. It supports 4K, HDR (which was the first time I saw my TV tell me it was running in HDR 10 mode) and Dolby Vision. It’s noticeably faster to use than the Google TV built into my 2017 Sony OLED TV, which also doesn’t seem to have HDR support for YouTube.


Should you buy this device?

If you want to have streaming apps on a TV that doesn’t have them, YES. If you have inbuilt apps but they’re slow and clunky to use, YES. For the price, it’s an easy investment into having a better viewing experience on any TV. If we start travelling around the world again, this would also be a great device to take with you to turn any hotel room TV with a HDMI port you can get to, into your personal streaming device. However, if your TV already has all the working apps you want for streaming content, this won’t give you anything new.

Home Network Setup – Ubiquiti Upgrade

Only a few months ago, I wrote up the current state of my home network setup. Since then, Ubiquiti have been kind enough to provide me some devices to upgrade my network.

This is what they sent me after some discussions on what would work:

UniFi NanoHD Access Point – to replace the UniFi AP AC LR.

UniFi In-Wall HD Access Point – to replace a 2 port wall point.

UniFi Switch PoE 8 (150W) – to run off the UDM and provide PoE to these new devices.

UniFi Switch Flex – to replace one of the downstream switches I had.


First, the UniFi Switch PoE 8 (150W)

I had my youngest son inspect the PoE switch before opening:

It looks like your standard switch from the front and back, and I patched a few things through it on my desk to make sure it all worked as expected:

As with all these devices, plugging in and using the Unifi Network dashboard which automatically detects them, to simply adopt it and be a managed device, was the simplest thing to do without any hiccups.

I needed the PoE switch in place first to then power the other devices I had, and not needing a power cable for them all both freed up a few power points and made everything cleaner.

I then moved the switch into the cupboard with my UDM, Intel NUC and Synology Diskstation… but after further changes, the cables were tidied up and the UDM relocated elsewhere.


The UniFi Switch Flex is quite a small unit, a 5 port PoE powered device. Very useful for a TV cabinet to provide more devices a wired connection

There was very little to do on this one again, plug it in downstream of the PoE switch, adopt it, and it’s up and running. It has a wall mount option but I didn’t need that for my use case, it was going in the TV cabinet.


The UniFi In-Wall HD Access Point was the most interesting of the devices; going into an existing wall point as a 5 port switch (one port in the back for the patch cable going to the wall point, and 4 available coming out) as well as being an AP.

For this I had a friend help who could actually do recabling work, since the laws in Australia for this sort of thing are particularly strict:

I was unlucky that I didn’t have enough room for the wall plate that came with the device – so my friend made the same sized hole in a standard wall plate, which then had the In-Wall HD AP attached to it.

Look at the end result! This removed the requirement for the UniFi AP AC LR that was stuck to the wall, and one of the switches I had:


I ended up deciding to put the UniFi NanoHD Access Point at the other end of the house while moving the UDM. Again, I needed my wiring specialist friend to sort this one out for me.

Near the bedrooms and in front of the toilet, where there’s probably a lot of Wi-Fi use, there’s now a professional looking AP on the ceiling, wired back to the cabinet and the 8 port PoE switch. Looks great and doubles as a night light towards the toilet!


After all that, I updated my topology diagram and removed the Wi-Fi devices to make it a bit easier to read:

Old Topology
New Topology

And here’s the updated floorplan with heat map:

2G Coverage
5G Coverage

With all networking devices being Ubiquiti, I get much better visibility end to end on what’s happening across the entire network, as well as updates and configuration all controlled via the single Unifi Network Portal.

Here’s what the topology looks like from the Dream Machine:

I’m very happy with the upgrades and the extra visibility I now get across my network. If I was starting from scratch, I’d strongly consider deploying a UniFi In-Wall HD Access Point at every wallpoint because they’re relatively cheap and provide a lot of flexibility for both network points and wireless coverage.

The Flex switch is also handy, but wouldn’t work off an In-Wall HD Access Point as they’re not PoE out, otherwise they’re very small and easy to keep out of the way.

The 8 Port PoE Switch 150w provides PoE that I didn’t have – if I’d bought a UDM Pro instead of a UDM I’d have it coming out of that and not need this, but I’m very happy with this setup and the reduction in cables it’s brought. Worth noting that the switch runs quite warm – it’s fanless though and designed to dissipate heat through it’s casing, which can be a bit concerning if you’re not used to it :) Working as designed…

Finally the UniFi NanoHD Access Point is physically a little bit smaller than the UniFi AC LR AP – they have different specs including throughput speeds, but the NanoHD is a better fit for my use case inside my house.

The entire Ubiquiti ecosystem for me is still rather set and forget; unless I’m actually making a change, or getting an alert that something’s down (children tend to play with cables!) then it does it’s job. If I do want to know what’s going on, or the coverage/throughput of a device for some reason, it’s all pretty easy to find out.