Diskstation

Synology Active Backup for Business Review and Walkthrough

Previously I’d already covered Synology’s Microsoft 365 Backup software which I was a big fan of, for simplicity of use and an incredibly cheap price point for a small to medium business as a Microsoft 365 data backup solution.

This time, I’m looking at Synology Active Backup for Business on their new DiskStation 1621xs+. Just like Microsoft 365 Backup, Active Backup for Business is free as long as you have a supported DiskStation model:

Applied Models

  • 21 series:DS1621xs+, DS1621+, DVA3221
  • 20 series:FS6400, FS3600, FS3400, RS820RP+, RS820+, DS1520+, DS920+, DS720+, DS620slim, DS420+, DS220+, SA3600, SA3400, SA3200D
  • 19 series:RS1619xs+, RS1219+, DS2419+, DS1819+, DS1019+, DVA3219
  • 18 series:FS1018, RS3618xs, RS2818RP+, RS2418RP+, RS2418+, RS818RP+, RS818+, DS3018xs, DS1618+, DS918+, DS718+, DS418play, DS218+
  • 17 series:FS3017, FS2017, RS18017xs+, RS4017xs+, RS3617xs+, RS3617RPxs, RS3617xs, DS3617xs, DS1817+, DS1517+
  • 16 series:RS18016xs+, RS2416RP+, RS2416+, DS916+, DS716+, DS716+II, DS416play, DS216+, DS216+II
  • 15 series:RS815RP+, RS815+, RC18015xs+, DS3615xs, DS2415+, DS1815+, DS1515+, DS415+
  • 14 series:RS3614xs+, RS3614RPxs, RS3614xs, RS2414RP+, RS2414+, RS814RP+, RS814+
  • 13 series:RS10613xs+, RS3413xs+, DS2413+, DS1813+, DS1513+, DS713+
  • 12 series:RS3412RPxs, RS3412xs, RS2212RP+, RS2212+, RS812RP+, RS812+, DS3612xs, DS1812+, DS1512+, DS712+, DS412+
  • 11 series:RS3411RPxs, RS3411xs, RS2211RP+, RS2211+, DS3611xs, DS2411+, DS1511+, DS411+, DS411+II

The support goes a long way back years wise, which is great to see. They have a comprehensive overview of this application and it’s abilities, but I’ll cover it all more briefly here while sharing my experience setting each type of backup up.

Installing the software on a Synology DiskStation is easily done via Package Center and a very quick activation process that requires a free Synology account:

After activating, you’ll immediately see the overview screen. At a glance, it gives a good idea on the sorts of things you can back up:

PC and Physical Server backups

Backing up a physical PC or Server is pretty easy, and the wizard takes you through the steps. Windows 7 SP1 and above is supported, as is Windows Server 2008 R2 and above, and needs the ‘Synology Active Backup for Business Agent’ installed. After a next, next finish, install, you’ll need to specify the IP/name of your DiskStation, and username/password:

After connecting and confirming the details, the PC is registered against Active Backup for Business, and the agent continues to run in the tray:

The agent will show when you last backed up, and if a backup is currently running:

No backups will run yet though, because we need to create a backup task back on Active Backup for Business. Again, a wizard will take you through this and let you choose what options you’d like for backup. I’m going to just back up everything, with the data compression and encryption options (which are default)

You then define when you want your backup to run – manually, or on a schedule:

I do quite like some of the options here – backup by event of screen locked or signing out is a nice way of making sure it doesn’t interrupt someone using the PC and slow things down while they’re actually working. Also having backup windows, so you can block out the working day if needed.

Next is the retention policy, a good way of reducing space taken – is there a difference between a backup 5 months ago vs 5 months and 1 day? Probably not, and very unlikely that you had something worth restoring on your PC only for 1 day.

At the end of the wizard and a summary screen, you have the option to back up now. I kicked this off, and the agent immediately showed the progress and events related to backing up.

This was a really easy and painless setup to back up a PC, but what about restoring? You can either create recovery media for a full restore, or you can use the Restore Portal to navigate through backups and pick what you’d like to restore:

The bottom time line lets you pick from what point in time you’d like to restore, with a dot showing each available time point.

Then, you can navigate through the disk you need, and go through the folders which match the file structure at the time of backup. Once you’re on the single file, multiple files or folder you want to restore, you can choose the “Restore” option to put the files back in their original location, or somewhere else, and decide if you want to automatically overwrite existing files or not.

Download however, will just download the file you selected like any other browser based download, or multiple files will come through as a single ZIP file.

File Server Backups

If you don’t want, or can’t have an agent on a file share, you can instead remotely back up via SMB or rsync:

After entering the remote server details:

It will verify they work, then let you set up a task:

The options are Multi-versioned, Mirroring and Incremental. They cover the different scenarios you might want to use – Multi-versions will take up the most space, where mirroring can only ever be as big as the source files, and incremental is half way between the two, without the versioning component:

You can then choose what to back up in the file share:

And then finish creating your task by giving it a name, telling where to backup the files to locally, and set a schedule.

The other option you’ll notice here is ‘Enable CSS for SMB File Shares’. If the source share supports this, then the backup can be taken without interruption to access of these files, which has been fairly standard for a while – so turn this on if you can.

The restore process is pretty much the same as PC / Physical Server, so I won’t go into detail on that part.

Virtual Machine

Both VMWare Hypervisor and Microsoft Hyper-V are supported Virtual Machine platforms. As I haven’t touched VMware for years, we’ll look at Hyper-V only. It’s worth noting that cross platform restores are supported – you can restore a Hyper-V VM to VMware vSphere too.

Creating a Hyper-V backup is again an easy process:

First, you’ll need to put in the Hyper-V Host details. If you’re trying to back up VMs on a Windows 10 laptop you have, there’s a few small requirements:

Set up WinRM by running ‘WinRM QuickConfig’ in an elevated command prompt. You’ll need to make sure none of your network connections are set to ‘Public’.

Have a local admin account ready to use, and allow SMB2 through the Windows Firewall by allowing ‘File and Printer Sharing’ on Private networks.

The Hyper-V Backup Task wizard will give you hints as to where you might be stuck, and at the end you’ll have your host listed:

The Hyper-V Virtual Machines will then be automatically detected and listed, but they’re not configured for backup yet – we need another task. Clicking ‘Create Task’ will start by asking you where you want your backups:

Then you can choose the Hyper-V VMs to back up:
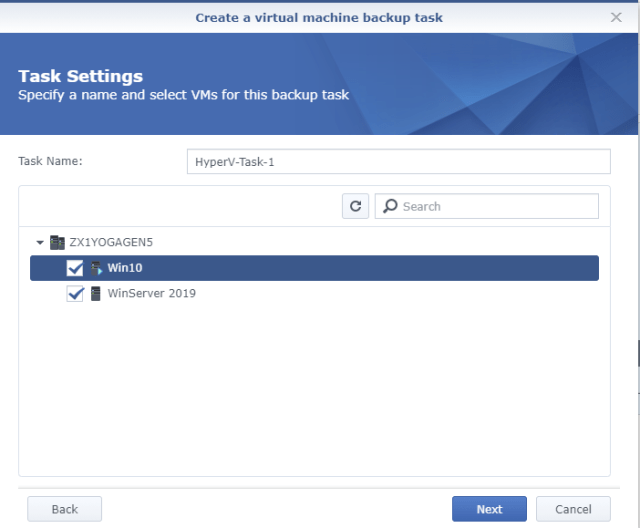
One selecting, we have several settings we can configure:

The default options are shown.

Maximum quantity of concurrent backup device(s) can be up to 10.

Enable Changed Block Tracking – Only transfer blocks that have changed since the last backup, rather than all blocks to reduce backup times drastically.

Enable application-aware backup – Use Volume Shadow Copy to ensure consistency with backups

Enable data transfer compression – Suggested for slow networks to improve transfer rates

Enable data transfer encryption – Self explanatory :)

Enable source datastore usage detection – to prevent running out of space

Enable backup verification – Checks the backup when complete

Once you’ve selected the options you want, you’ll see the familiar Schedule Backup Task window, retention policies etc:

I always prefer an agentless backup where possible, so it was good to see no agent was required to backup Hyper-V VMs.

Backing up a Windows Server 2019 VM was rather quick – especially since the laptop hosting the VM was connected via Wifi.

Restoring is again pretty simple, you can navigate to the location of the backups and see a copy of the vhdx for each VM, with other files I expect keep other incremental change data:

The Restore Wizard starts by letting you pick witch platform you’re restoring to- Synolgoy Virtual Machine Manager gives extended options for management and recovery and is recommended for flexibility in production environments. For a lab, you should be able to get away without it:

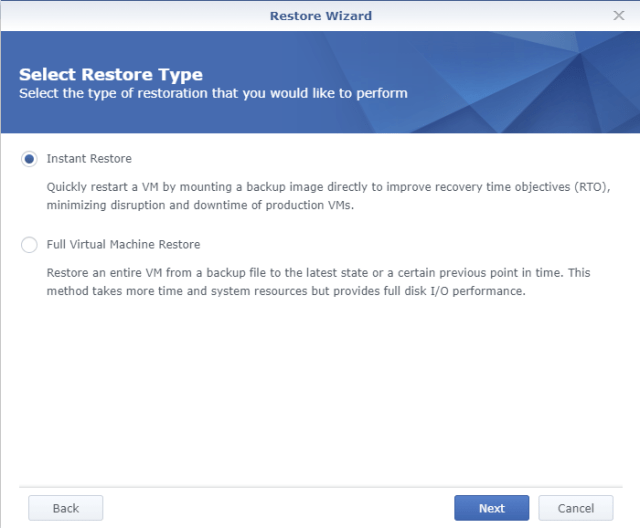
Restore Type – Instant Restore and Full Virtual Machine Restore are the two choices:
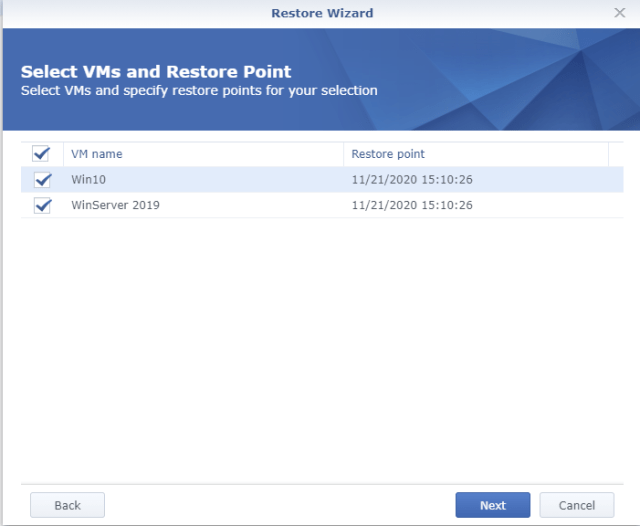
You can then pick which VMs you want to restore and which restore points:
Restore Mode lets you choose if you’re replacing the current live VM, or restoring to a different location as a copy:

Finally, the summary screen with the option of automatically powering on the VM when complete.

Phew! That’s the runthrough of the backup types and restore options Active Backup for Business supports.

The dashboard gives a great ‘at a glance’ overview of everything going on, and we even have de-duplication of data! This is what it looks like with some real data in it, compared to the first screenshot of this post:

There’s a bunch of other first party Synology apps available too:

Plus third party apps:

And with solutions like Docker, you can use your Synolgoy to host many other solutions available in containers, and run them off this little black box.

I’ll say the same thing about Synology Active Backup for Business I did in my Synology Microsoft 365 Backup Review – this is pretty impressive for ‘free’. Yes, you have to buy the Synology DiskStation itself, and you’ll need disks, but that’s it. Even if you use it as a single nightly backup for having a local and quickly accessible restore point to provide as much business continuity as possible, it’s an entire solution at an incredibly cheap price point.

Because you can do both Microsoft 365 data AND Hyper-V VMs on this single device, it should be an option that any small to medium business should investigate. The interface is easy to use, the logs show detailed information about what’s going on – and even for a home business setup, it’s very much a set and forget event.

Migrating from a Synology 8 bay NAS to a 6 bay NAS

I currently have a Diskstation 1813+ 8 bay NAS which is doing a great job, but since Synology gave me a 1618+ to review, and the 1813+ is 7 years old, I’m migrating over to that instead. The catch is that I have 7 drives already in the 1813+ in a single SHR setup. How do I get that across to the newer 6 bay NAS? This is actually a writeup of the planned migration, rather than the success at the end… and the goal is to reduce costs. I could just buy 6 new 10TB drives and have an easy migration!

Yes, I’ve lied in bed at night thinking about this and the best approach. I have 40TB of space, ~30TB in use in a SHR setup:

If I had somewhere to just copy 30TB of data to temporarily, it’d be easy. Copy the data off, move 6 of the drives, create a new SHR, copy the data back and done. Except, I don’t have 30TB of space anywhere.

It isn’t possible to take a disk out of the SHR setup (i.e. shrining the volume size and somehow telling it to abandon one of the disks), so I can’t get a disk that way. I can however, take one disk out and break it’s redundancy while moving data. Risky, but that could give me at least the 12TB disk to use as temporary space. That’s a start.

It’s unavoidable, I’ll need to buy some more disks for temp space. I can get two external 10TB Seagate HDD for $283AU each and use those as temporary space along with the 12TB disk. That’ll get me my 30TB to copy everything off while I juggle the rest of the disks.

That leaves me with 2x 10TB and 4x6TB in the old SHR setup. There is a limitation of SHR which is worth understanding:

For SHR: The capacity of the drive you intend to add must be equal to or larger than the largest drive in the storage pool, or equal to any of the drives in the storage pool.
Example: If an SHR storage pool is composed of three drives (2 TB, 1.5 TB, and 1 TB), we recommend that the newly-added drive should be at least 2 TB for a better capacity usage. You can consider adding 1.5 TB and 1 TB drives, but please note that some capacity of the 2 TB drive will remain unused.

https://www.synology.com/en-au/knowledgebase/DSM/help/DSM/StorageManager/storage_pool_expand_add_disk

What that means is, if I take the very slow approach of building up a SHR with just the two 10TB disks, then look to add more disks after, I can’t add a 6TB disk.

However, I can move all 6 remaining disks across and create a new SHR giving me a bit over 30TB:

Once that’s done, I can then copy all the data off the temporary 2x10TB and 1x12TB disks to the new Synology DiskStation 1618+. Great, except I want to use all four 6TB disks elsewhere and the end result would leave me with 4x10TB, 1x12TB and 1x6TB. I can’t remove the last 6TB disk without having an equal or bigger disk to replace it with, and I don’t want to but a third 10TB disk at this stage.

What I can do is set up the SHR being 1 disk short, leave out the last 6TB disk so I have 2x10TB and 3x6TB, which will give 28TB of space. Enough that I can then copy the contents of any two of the three temporary stoage disks (2x10TB and 1x12TB), and as they get cleared, add them to the SHR.

Each time I add a disk to the SHR it might take a day or two though – this process will take a while. I’ve got multiple points of failure (original SHR has no redundancy, single temporary storage disks all have no redundancy). I can only change one disk at a time.

Once I’m at 4x10TB and 1x6TB in the new SHR, I’ll have enough room to copy the 12TB of data off the spare disk, onto the SHR, then swap out the 6TB for the 12TB.

I also need to make sure for my own neatness, that the 6th bay doens’t have a drive in it at any time. Drives can’t be physically moved around in a SHR, so I don’t want to have 5 drives in a 6 bay NAS and have a ‘gap’ in the middle where there isn’t a drive. Not a dealbreaker on the move, but still :)

In summary:

  • Buy 2x10TB drives
  • Copy 20TB of the 30TB to the two drives I bought
  • Remove 1x12TB drive from SHR in the 1813+ NAS and break redundancy.
  • Copy remaining data to the 12TB drive mounted somewhere else.
  • Move 2x10TB and 3x6TB into the new 1618+NAS and create a SHR.
  • Copy the data off the 2x10TB drives to the new SHR.
  • Swap out one 6TB drive for a 10TB drive and repair the array.
  • Swap out the other 10TB drive for another 6TB drive in the array.
  • Copy the data on the 12TB disk onto the SHR.
  • Swap in the 12TB drive with the final 6TB drive.
  • All 6TB drives can go back in the 1813+ for other purposes

I think that’s my plan. I’ll update this post once I’m at the end of it (currently awaiting the arrival of the 2x10TB drives). Can you poke any holes in my plan?

21/07/2022 Long overdue update

The above did work, but I’ve moved a long way down the path since then. No 6TB drives to be seen, and I’ll do a new post about the updated setup – I’m now running 18TB drives! Still the same SHR and it’s nice that I’ve been able to continue to grow it without more muckarounds like the above!

Synology DiskStation Microsoft 365 Backup Review

Synology sent me a new DiskStation to review after I’d acquired an older one myself to look at it’s ability to back up Microsoft 365 data (the updated name for Office 365). Being a Microsoft MVP in Office Apps and Services category, so I was very interested to see how it worked.

After reading up on and seeing that it was a completely free piece of software available as part of owning a DiskStation, I was hoping this would be a good solution at an incredibly low price – buy your DiskStation and disks, some time to set it up, and you’re done. To me, that’s already a very appealing offering, along with Synology having a good reputation for maintaining and supporting their hardware several years on – which was proved by the 7 year old DS1813+ I set up a few months ago.

I’ve left the new Intel-based DiskStation 1618+ – Quad Core CPU and 4GB RAM (expandable) running for about a month now, backing up my Microsoft 365 tenant’s data. I ticked ALL the options to see how it went. This tenant is just for me, so the data set is smaller than most tenants – but I do run a few live things through it like email and OneDrive. There’s also a little SharePoint Online data from Micrsoft 365 Groups and Teams I’ve played around with.

Here’s what the dashboard looks like now:

Some useful information there around what’s being backed up and how big it is. You might notice there’s a few errors on the summary. I drilled into those and each was because ‘The Microsoft Server is busy’, and a few minutes later it would try again successfully.

This is likely because I used a backup option to get incremental changes, rather than at a set time. Maybe I’m hitting it too much and getting blocked occasionally.


I know I’ve gotten ahead of myself here, so let’s go back to how to set this up. Assuming you have yourself a Synology DiskStation of some sort that supports ‘Active Backup for Office 365‘ – and which models are those? Here’s the list:

  • 20 series:FS6400, FS3600, FS3400, RS820RP+, RS820+, DS920+, DS720+, DS620slim, DS420+, SA3600, SA3400, SA3200D
  • 19 series:RS1619xs+, RS1219+, DS2419+, DS1819+, DS1019+, DVA3219
  • 18 series:FS1018, RS3618xs, RS2818RP+, RS2418RP+, RS2418+, RS818RP+, RS818+, DS3018xs, DS1618+, DS918+, DS718+, DS418play, DS218+
  • 17 series:FS3017, FS2017, RS18017xs+, RS4017xs+, RS3617xs+, RS3617RPxs, RS3617xs, DS3617xs, DS1817+, DS1517+
  • 16 series:RS18016xs+, RS2416RP+, RS2416+, DS916+, DS716+, DS716+II, DS416play, DS216+, DS216+II
  • 15 series:RS815RP+, RS815+, RC18015xs+, DS3615xs, DS2415+, DS1815+, DS1515+, DS415+
  • 14 series:RS3614xs+, RS3614RPxs, RS3614xs, RS2414RP+, RS2414+, RS814RP+, RS814+
  • 13 series:RS10613xs+, RS3413xs+, DS2413+, DS1813+, DS1513+, DS713+
  • 12 series:RS3412RPxs, RS3412xs, RS2212RP+, RS2212+, RS812RP+, RS812+, DS3612xs, DS1812+, DS1512+, DS712+, DS412+
  • 11 series:RS3411RPxs, RS3411xs, RS2211RP+, RS2211+, DS3611xs, DS2411+, DS1511+, DS411+, DS411+II

From the DiskStation desktop, open Package Center and follow these steps:

This was a very easy setup to do – I took screenshots of every step involved, but it barely needs an explanation for anyone who’s an admin of a Microsoft 365 Tenant.

The program will then go off and start backing up what you told it. The ‘Activities’ section of Active Backup for Office 365 will show any backups running, and you can also use the inbuilt ‘Resource Monitor’ to see upload/download speeds, disk utilization etc.

It’s also worth noting that the backup you created has an ‘account discovery’ option where it’ll find any new accounts created and automatically add them to the backup, which is great for not having to change backup settings each time you have a new user start.


Running a backup is great, but how do you restore the data? There’s a second app you’ll need, ‘Active Backup for Office 365 Portal’. Launching this will take you to a web interface where admins can browse all data, and users can browse just their own (user access can be disabled if you prefer).

On this web interface, you can then find the file(s) you want to restore, and restore them. You also get a nice timeline down the bottom so you can move backwards and forwards to see a snapshot of a certain time.

Although Mail, Calendar, Contact, and Site (SharePoint) support searching across all backups for names and contents, at the time of writing this isn’t possible for OneDrive backups. It’s worth being aware of this – if someone requests a file restore you’ll need to know exactly when from. I don’t see this as too much of an issue though, as OneDrive has great version control natively, and an automatic recycle bin – so you’d probably rely on the native solution for finding a file, but still it’s worth knowing this existing limitation.

That was the only slight negative I could find while testing. Everything else just worked, was quick to browse and restore, and incremental backups appeared to be on the DiskStation within several seconds after creating a new file in OneDrive.

Again, this is an incredibly cheap Office 365 backup solution. Some may question if you need to back up Office 365 at all. You could set up infinite retention against all content, so why take a backup? To me it’s a definite grey area, and partly depends how much you value the data. Microsoft may never lose your data, but will it be available 100% of the time? What if that important document is in your OneDrive and hadn’t synced down, and there was an outage? We’ve seen a few outages lately, including ones that have broken authentication – your data is still there, but you can’t get to it. In that scenario, having a local copy of something time sensitive could be worth it. Considering the relative low cost of buying a Synolgoy DiskStation – your disks are probably going to cost more than the unit itself, I consider it a pretty easy sell.