Microsoft has been planning to migrate Microsoft 365 services to a new domain – cloud.microsoft – for over a year.
Back in April 2023, Microsoft announced the upcoming change with a starting sentence: “…today we’re excited to announce that Microsoft is beginning to reduce this fragmentation by bringing authenticated, user-facing Microsoft 365 apps and services onto a single, consistent and cohesive domain: cloud.microsoft.”
As pointed out to me by Microsoft MVP Karl Wester-Ebbinghaus, who in turn was reading this post from Dr Windows aka Martin Geuß, there is now an update on the Microsoft 365 Message Center called “Product transitions to the cloud.microsoft domain – February 2024” Message ID MC724837 (published on March 5th which is still almost February). It calls out that the new domains are starting to go live, in parallel with existing domains – meaning you won’t get redirected to the new ones yet.
List of live cloud.microsoft subdomains as of 12/03/2024
As Microsoft has exclusive rights to the .microsoft top-level domain, any content on here can be held at a pretty high standard. Make your own decisions around what you may allow from the single .microsoft doamin, or the initial sub-domain of cloud.microsoft. You may need to add the domain/subdomain to allow lists.
What the above changes also mean for me personally, is a lot of ongoing work on MSPortals.io to keep it up to date, as well as keep the old links on there while they still function:
I’ll do my best to keep MSPortals.io as updated as possible, but if you notice anything that needs an update, please contact me or use the GitHub option on the site to submit an update.
Other notes and take aways from the message center post:
It appears the planned end-dates of non cloud.microsoft URLs for Microsoft 365 services is somewhere between June 2024 and September 2024.
Update documentation and communicate the change to end users – this can be a good chance to train or rehash what domains are, which helps in user understanding of phishing attempts (both web based and email).
If you have any tools build that connect to Microsoft 365 services (3rd party, or internally developed) make sure they’re aware of the upcoming changes and have a plan to update.
Synology asked me to have a fresh look at parts their C2 suite – I’d previously dived into their C2 Backup for Business solution almost a year ago, and I’m keen to find out how they’ve progressed.
For the Encryption Key, there is also a Recovery Code as a backup if the Encryption key is lost – but without either, you can’t access any C2 service and your access is lost. The only option is to reset your C2 Encryption key which is destructive – all data in the service is lost because there’s now no way to decrypt the data Synology is hosting for you on the C2 services. I know this because I almost had to reset it (which would be fine, I was only using my own test data), but managed to remember what I’d entered as the key originally. It’s also worth noting that you can generate a 1 page PDF of your recovery code details – this would be worth printing out and putting in a safe in case of emergency.
Passkeys can be used instead of an Encryption Key, where biometrics/PINs are used, rather than a password. This is the more modern way things are going, so it’s worth setting this up.
C2 Identity
This is where Synology sees the C2 Identity cloud service sitting. Here’s where I can see it providing the best value:
“Sync users and groups from Windows AD or migrate seamlessly from Synology LDAP Server without the need to reset users’ accounts or passwords.” If you have an on-premises Synology device providing LDAP services, then seamlessly migrating it to C2 Identity would be a smooth approach to turning into a SaaS solution. Moreso, a company that has identity solutions all over the place could benefit from having this modular approach. If you were heavily invested and aligned with a single cloud provider, it may be best to use their pure native solutions end to end – but a mix of cloud auth providers, or a company who’s Microft Entra ID based who’s bought out another company that’s Google Cloud Identity based, could use this to bring in a standard and centralised authentication service.
Note that this service does not sync users/identities with cloud services such as Microsoft 365, but you can use that as a source for a one time import:
For my purposes (and because I don’t have a userbase!), I created a user manually – myself.
Managed Devices
C2 Identity isn’t just about usernames and passwords either, you can manage devices using an agent (both Windows and macOS supported)
The connect key has been regenerated since this screenshot :)
The install of the agent for me was very quick and easy, and just runs inthe background. Once registered, the device will show in the C2 Identity portal with some basic information:
Command
What’s better though, is the Command options you can apply to your managed devices. These are commands you can trigger – either any command you want to do yourself, or pick one of the inbuilt ones which will continue to grow. Easily triggering an Auto-update of Windows across your entire fleet, or easily selecting a device to remote desktop to (and ping at the same time – I remember doing this as my first manual step any time I used to RDP to a desktop at work!).
These commands can either be run on demand (manually) or on time schedules/events (event options are at startup or at login):
Although reasonably simple, I can see this being very useful for a small business or a business with light requirements. Giving your 1-3 IT staff a tool like this makes both identity management and computer management easier than using native tooling alone (as well as the cross-platform support of both Windows and macOS).
Application
Another useful option is being able to add external identity providers (a.k.a. Applications). This allows you to use the single identity from C2 Identity across multiple solutions such as Google Workspace, Microsoft 365, Dropbox, and anything that support SAML (which these days is most things!).
The Edge Server option lets you “Set up an edge server that retrieves directory information from your C2 Identity. This server will authenticate C2 Identity users’ access to on-prem resources.”. This can run off either a local Synology NAS, or anything running Docker.
Other options include the Log of actions in C2 Identity, as well as Settings which has many customisations for an administrator of the service – as well as being able to brand your instance of C2 with your company’s logo, or look at setting up Passwordless Sign-in (beta at time of writing).
C2 Password
C2 Password is a password management system, and is actually free for personal use! If you want to give it a try, here’s the link. Also, here’s Synology’s C2 Password Security White Paper for those interested in some of the security specifics of this solution.
C2 Password has many supported platform extensions – iOS, Android, Google Chrome, Microsoft Edge, Mozilla Firefox and Safari. This should cover most normal business purposes, and is a nice cheap way of providing a managed password solution for both individuals, and a shared vault which can be handy for saving centralised/shared passwords (yes this is never great but you can’t control the password solutions of all your vendors)
The solution offers standard password generation options, as well as a ‘Login Security Overview’ which shows compromised passwords, weak passwords, reused passwords and Inactive 2FA (accounts without 2FA configured). This is visible to each user over their own vault, so is a nice easy way of putting concerns ‘in their face’ and to encourage better account management hygiene practises.
C2 Backup
C2 Backup for Business is a backup solution for both on-premises and cloud workloads. There is also an C2 Backup for Enterprise tier which has unlimited users, teams, and devices with 25TB available storage, and more available to add on. C2 Backup for Business however starts with:
5TB of available storage 250 maximum users 50 maximum teams Unlimited devices
On-premises devices
This can either be personal computers or physical servers. Again, a backup client is required to be installed onto the device. The default policy is to back up the entire device (including anything plugged in externally such as a USB drive), which may be good for a very small business. However, there’s also the option to target just the system volume, or whichever volume you specify. This can be scheduled on a time basis such as daily, or event driven.
To manage your available space, you can use version control options too – maybe you just want the last 14 days of versions, or only the last 5 backups. You can also do tiered versioning (last day, week, month year) which may be a better option for on-premises servers.
If you have concerns about available bandwidth to a site, you can also define maximum upload speeds.
There is extensive documentation and guides on everything in the Synology C2 solutions, including how to restore a backup. If you want to do a bare metal restore, you can create recovery media on USB, or just recover certain files and folders to another computer which is just navigating through the version of the backup you want, picking the files/folders, and downloading. Easy!
Using the default policy on a home computer may capture a bit too much information!
Cloud Data
You can also backup Microsoft 365 data with the same subscription above – data stored on OneDrive for Business, SharePoint Online, Exchange Online, and Microsoft Teams. Once connecting to your Microsoft 365 tenant, the setup wizard will ask what you want to back up: which users, which sites (i.e. SharePoint Online), and which Teams. Although as part of setup you pick which items you want to back up, you also have the option of ‘auto-protection’ which will add anything newly created to the backup schedule, so you don’t have to go back each time and add them manually.
Your policy will also let you choose what data is backed up – Email, OneDrive, and Chat data. Again we have retention rules for versioning too.
For a small business, one of the nice aspects of this is a cloud to cloud backup (from Microsoft 365 > Synology C2). The bandwidth used between these two will have no effect on end users, especially important for sites with low bandwidth available.
To restore any of this data, there is a special ‘Recovery Portal‘ you can navigate to and restore the data locally.
Finally, in the Management section for C2 Backup you can look at a few options around notifications for events such as a backup failing, or when used storage is getting low. You can also see the state of each user and their used space for backups.
Summary
The Synology C2 Identity and Backup solutions are a good and relatively cheap priced (compare the prices for Backup and Identity) that are perfect for business that want to keep things simple. This can either be a business that has a mix of on-premises and cloud, or even purely Microsoft 365 cloud that needs a cheap backup somewhere just in case. I found the tools both portals and end user quite simple and easy to understand, laid out quite well. I will call out that being a simple solution, means it may not have the features or complexity requirements that some business may have – but the price of this solution reflects that. This can be a cheap way of ticking certain compliance options around data storage/backups and identity management too. The C2 web interface was incredibly snappy to use with every page and menu loading quickly – not something that can be said about many other solutions.
These solutions also have 30 day trials (Backup, Identity) that you can play around with, to see if they’ll suit your requirements.
Microsoft 365 has an in-built option to expire Microsoft 365 Groups that are no longer in use. Details around this are well documented Microsoft 365 group expiration policy | Microsoft Docs – but I thought it was worth digging a bit deeper into the why and how of Microsoft 365 Group Expiration Policy. The below is my understanding of how the platform works based on personal testing.
It’s easy for an administrator to come to the conclusion that they have their Microsoft 365 Groups under control. Maybe the creation of Microsoft 365 Groups is restricted in the tenant to a subset of users, or admins only – ensuring only approved groups are created with a reasonable naming convention. Maybe that is combined with a Microsoft 365 groups naming policy | Microsoft Docs which includes blocking custom words so users can’t create another group with the name ‘Finance’ in it and create ungoverned areas.
If these controls are in place, why would you want any Microsoft 365 Group to expire? There’s the risk that a wanted group gets deleted and misses the 30 day window of recovery (maybe it’s a group used heavily only once a year for a week) and group expiration is more hassle than it’s worth?
There are a few main driving factors on why you should deeply consider enabling Microsoft 365 Group Expiration Policy:
Clean up old groups – despite having a good control of group creation and naming convention sorted, users will rarely advise when a group is no longer used or abandoned. Maybe it was a committee that fell apart when certain people left the organization – IT will rarely be across and care about abandoned groups. Although it’s messy and confusing to have a bunch of abandoned groups sitting around, there’s a bigger driver to clean these groups up;
Reduce data held – Data should be held for as short as time as possible; of course complying with data retention laws and in line with the company’s data retention policy. The more data you have, the more data you have to lose. Useful data of course should be kept for as long as it is useful, and it can be very difficult to define what data falls into this category. There’d be a faily strong argument though, that an abandoned group holds no important data (unless the group had been targeted by a data retention policy, because the data had already been classified). Hanging onto unmanaged, abandoned data is an easy way for the data to be leaked down the track. Think of a group that has guest access but nobody’s managing – that guest could come back years later and extract the data which should have been cleaned up.
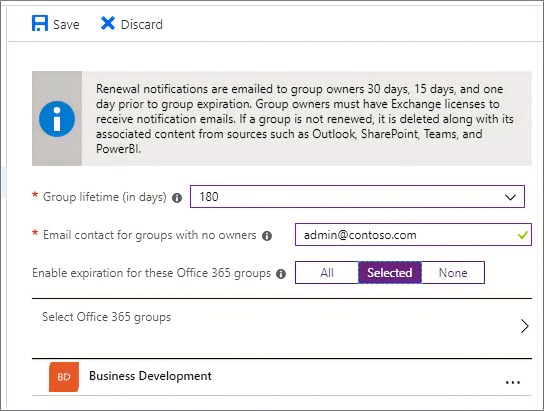
Microsoft 365 Groups should have more than one owner – avoid scenarios where the 1 admin of a group departs the company and abandons is, by always having at least 2 owners of a group. If they end up being the last owner, it’s up to them to find a second one. Microsoft 365 Group Expiration Policy will handle the scenario of an abandoned group (one with no owners) by instead sending an email to a specified address in the Microsoft 365 Group Expiration Policy settings:
Source: Microsoft
Other considerations before enabling Microsoft 365 Group Expiration Policy:
Exchange licenses: All owners of groups need an Exchange license. It should work if they’re on-premises and in Exchange Hybrid mode, AND an Exchange Online license applied to the account. There are scenarios where this license component may not be enabled against an account to avoid having multiple mailboxes (one in cloud, one on-prem), so it’s worth verifying.
User awareness: Before turning this on, make sure communication is provided to end users. People have a tendency to ignore things they don’t understand or don’t think are important, and will then be complaining loudly when their group was deleted after the third email notification asking them.
Pilot: Rather than enabling this for all groups in your tenant, start with a subset of selected groups to make sure you understand how the process works. This list is limited to 500 groups.
When you first set up expiration, any groups that are older than the expiration interval are set to 35 days until expiration unless the group is automatically renewed or the owner renews it.
For example, if an owner or a group member does something like upload a document to SharePoint, visit a Teams channel, send an email to the group in Outlook, or view a post in Yammer, the group is automatically renewed around 35 days before the group expires and the owner does not get any renewal notifications.
For example, consider an expiration policy that is set so that a group expires after 30 days of inactivity. However, to keep from sending an expiration email the day that group expiration is enabled (because there’s no record activity yet), Azure AD first waits five days. If there is activity in those five days, the expiration policy works as expected. If there is no activity within five days, we send an expiration/renewal email. Of course, if the group was inactive for five days, an email was sent, and then the group was active, we will autorenew it and start the expiration period again.
If you carefully read the above, there’s a few takeaways. Regardlesss of the Group Lifetime value, when you first enable the policy, it will immediately treat groups without an expiration date as being 35 days until expiration. If the group gets renewed in this window, the expiration date gets set to the current day + group lifetime value (default 180 days). It would be easy to assume that when enabling this, you’d have a 180 day window but that’s not the case.
The other big clarification is around how automatic renewal works. It doesn’t check for the entire lifetime of a group on whether it’s active or not – there is a 5 day window when the group is 35 days from expiry, to 30 days from expiry, where it will check for certain actions to automatically renew.
Microsoft 365 Group Expiration Policy is a feature worth considering and investigating, and hopefully the above gives you some other considerations that may not be clear from an initial look.
This was originally posted on Twitter but thought it was worth preserving on my blog using the ‘Unroll‘ option.
Replika is ‘The AI companion who cares’ according to their website. It’s supposed to be a virtual friend. It’s a chatbot – but is it AI? My guess is probably not, but see what you think from the following conversation:
Microsoft released Bookings several years ago which was a great solution that originated from the small business side, allowing customers to book times with a company such as a hairdresser; anywhere that having timeslots available against one or more employees made sense.
This expanded out to Enterprise users, and I used it myself to provide external people a way to book time with me easily. Through a link, they would get taken to a portal with some basic options I’d configured, and based on my own calendar’s availability plus the options (such as 1 hour meetings between 10am and 2pm), anyone with that link could create a meeting with me.
The catch was that someone would need to configure this in a Microsoft 365 tenant, which created another account and a special calendar to manage this. A user couldn’t set this up themselves if things like Group Creation are restricted.
This is where Bookings with me comes in. Currently available worldwide in preview (July 2022), if enabled on your tenant and you have any of the below licenses, you can enable and starting using Bookings with me:
Office 365: A3, A5, E1, E3, E5, F1, F3
Microsoft 365: A3, A5, E1, E3, E5, F1, F3, Business Basic, Business Standard, Business Premium
Meeting organising options
There’s 4 native Microsoft solutions I’m aware of (beyond Scheduling Assistant in Outlook for Microsoft 365!):
FindTime
Scheduler and Cortana
Bookings
Bookings with me
FindTime is available as an Outlook add-in or can be accessed via https://findtime.microsoft.com/. It’s designed to be used contextually when you’re trying to organise. Tell it who you want to invite, pick several time options (and if you have their free/busy, it will firstly show times everyone is available), send out the invite. Recipients vote on which times work for them, and once the votes are in, a meeting is booked. An online guide is available talking through all this and if you aren’t already using FindTime, I highly recommend checking it out.
Cortana can also organise a meeting for you using Scheduler. In an email, you tell Cortana to book at meeting without any special commands, and she sorts it out with everyone. I need to play with this one more, as it sounds too easy to do! Watch the video here to get a better idea how it works.
Bookings creates a special calendar that can be used by other people to book time with you. They go to a webpage and select from options you’ve configured, and it’ll create a meeting. This can be with 1 or more people, or from a selection of people.
Bookings with me is like a lighter version of Bookings, and it’s in the name – it can only be with you, but similar booking rules can be created, and the other person books you through a web page.
The original Microsoft Bookings can be accessed by going to your Outlook mailbox and down the left side, click the ‘b’ logo:
This will take you to a page where you can get started with Bookings.
However, Bookings with me is different and can’t be accessed that way. Instead, go to your calendar on Outlook for the web, and if available/allowed in your tenant, there will be a ‘Create bookings page’ link you can use – or just try this link: https://outlook.office.com/bookwithme/me
Once there, you’ll be presented with two options; public, and private.
Both of these options create rules on what will appear for people to be able to book with you, the difference being one everyone can see, and the other only viewable with a specific link. Good if you want to give certain people extra options/special access/longer meetings and so on.
Regardless of the choice you pick, the options shown are the same, and you can change your mind once you’re in it anyway between public and private.
The options are fairly self explanatory here, you can decide if it’s a Teams meeting or not, how long the meeting will go for, and if you want buffer or lead times.
It’s worth just creating a very basic meeting option, because it takes a little while for your Bookings with me page to get created (roughly 5-10 minutes for me, others have reported up to 30 minutes):
When done, you’ll then have the option to be able to share your Bookings page.
The link will be unique to your page. Here’s what someone clicking the link sees:
Note that consumer Microsoft accounts aren’t supported – it’s a work or school account, or guest. Once in, you’ll then see the meeting types and times available for each type:
You’ll be asked for basic details – Name and Email are mandatory, with notes letting the person hopefully tell you why they want the meeting. A guest needs to verify their email address with a verification code, and then both parties receive the meeting invite.
That’s really it. A simple idea that’s executed well. It’s a hugely useful way of letting people book a time with you and not needing to go back and forth around availability. The other options at the top of this post are better ways when there’s more people involved at your end, but for what it’s trying to achieve, I use it as much as I can.
Regardless of which option you pick – avoid trying to manually organise meetings if you can’t see everyone’s availability for yourself!