Office 365

Users Managing Email Groups and Exchange Online

For a very long time, users have been able to manage email group members via the Outlook client. Going into the Address Book, finding the group in the Global Address list, going into Properties and choosing ‘Modify Members’:

From there, someone can add or remove members as long as they’d been added to the “Managed By” field against the object in Active Directory, as well as ticking the box “Manager can update membership list” below it.

Easy! Except, that no longer works if the user is in Exchange Online, and the Email Group is from on-premises AD rather than Azure AD/Office 365. It’s not supported. This problem has been around for a while, back in 2015 Perficent wrote about this same topic. The options given for managing these groups are:

  • Exchange Admin Center
  • Exchange Management Console
  • Exchange Management Shell

None of those are what you want your standard users touching in my opinion – although you can give someone access to the Exchange Admin Center and only see the distribution groups they own – but for me, I’m still on Exchange 2010 so this isn’t an option.  This leaves you with a few options:

1. Change all your email groups to Cloud based groups. If this makes sense for you, doing this will let the manager of a cloud based group add/remove members via the Outlook Address Book.
You can also look at changing distribution groups over to Office 365 Groups (which are also cloud based), which give a whole bunch of different features beyond a what a distribution group can do, while giving the same standard DG experience.

2. Make all requests come through to IT so you can make the changes yourself. Not great for anyone involved, as it’s double/triple handling something where the user could quickly do it themselves.

3. Create Dynamic Distribution Groups and let automation do it’s thing – which will work for some, but exceptions to rules and the inability to see who’s in a group can make this frustrating for some.

4. Provide another way for staff to change group members themselves.

I’ve gone with option 4 – as I’m a big fan of Adaxes which I’ve written about a few times on my blog before, and they have a nice way of giving users a web interface that only lets staff manage the groups they’re the owner of.

There’s other ways to do this as well of course and other 3rd party solutions that can expose ways of adding/removing members of a on-premises distribution group – but remember there could be up to a half hour delay in syncing the change from AD to AAD via Azure AD Connect. If possible, look at adding a trigger at the end of a group change to do a delta sync:

Start-ADSyncSyncCycle -PolicyType Delta

That’ll be the quickest way to get the change up quickly, as staff may be used to the change working immediately.

There’s a lot to consider on how you’ll manage this, so make sure it’s sorted before you migrate – or expect a lot more tickets going through your helpdesk.

Migrate a Single Mailbox Out of a Exchange Online Migration Batch

A few posts on this since it’s what I’m working on :)

It is possible to sync all your mailboxes from Exchange On-Prem to Exchange Online as a single batch, and then complete individual items – but it’s not obvious that this is even possible.

Normally if you start a migration, you can choose multiple mailboxes or use a CSV file to specify which accounts to start migrating – while specifying the option to manually complete the batch, so the actual migration happens when you want it to:

The problem is, once you’ve fixed any problems that arise and mailboxes are in a ‘synced’ state, there’s no visible way to complete a single mailbox – just the whole batch. That may not be what you want to do. You could work out a way to create a separate batch for every single mailbox you’re migrating, but there’s also a way to complete one mailbox at a time.

In PowerShell, once you’ve connected to Exchange Online, you can run the a command to see all the mailboxes syncing, and their status:

Get-MoveRequest

If a mailbox is ready to be finalised, it should have the status of ‘Synced’. This is different to the status of ‘Completed’, which occurs once the mailbox has been fully migrated across.

To trigger the completion of a single mailbox in a batch, use this PowerShell command:

Set-MoveRequest -Identity “mailbox name” -CompleteAfter 1

The mailbox will then do it’s final syncing and complete, without affecting the other jobs in the same batch. The -CompleteAfter parameter is supposed to set the delay before the request is completed in date/time format, but using the value ‘1’ seems to immediately trigger this.

Now you can do a single batch job, and selectively complete mailboxes as you choose – easy! 

(Note that there was an old method of doing the above by setting the variable SuspendWhenReadytoComplete to $false which no longer works)

OneDrive for Business – Turn Off ‘Allow Editing’ By Default

Update 21st March 2019

You can now find these settings in the OneDrive Admin Center (Preview) at https://admin.onedrive.com and that’s a clearer experience.

Update 16th April 2020

As the SharePoint Admin Center has been updated, here’s the area to find the view/edit choice:

Original Post

Every organisation has their own requirements and standards. For mine, I see a risk when the default action of sharing a document via OneDrive for Business is the ability to ‘Allow editing’ of any document sent out. It’s worse because that option is hidden behind the main popup when sharing a file, and you don’t actually see that you’re giving ‘modify’ access rather than ‘read only’:

OneDrive for Business default sharing popup
OneDrive for Business ‘Allow editing’ on by default

There is a way to change this default behavior though, and it’s not in the OneDrive admin center.

Instead, you’ll need to head to the SharePoint admin center (since the backend of OneDrive is SharePoint Online, this makes some sense). From here, go into ‘sharing’ and there’s an option around ‘Default link permissions’. You can change this to ‘View’ rather than ‘Edit’:

SharePoint admin center

The change was immediate from my testing, as soon as I went to share another file via OneDrive for Business, the ‘Allow editing’ option was unticked. This is only changing the default too, someone can still decide they want to allow editing and tick the box.

It’s worth considering what you should have as your default. The new versioning in OneDrive/SharePoint Online is really good, and will let a user easily roll back to a previous version of a document if something accidentally gets changed – but will your users be aware if something does change? It’s possible to set up an alert, but it’s a bit tedious: http://itgroove.net/brainlitter/2016/05/16/creating-alerts-documents-new-onedrive-business/

Hope this helps anyone considering rolling out OneDrive, or wants to start allowing external sharing.

How To Change The Microsoft Planner Date Format

Updated 20th January 2022

I’m a big fan of Microsoft Planner, and it’s a great way to intro people into using some of the extra Office 365 features that gives a pretty quick benefit with very little training.

However, this is one problem I’ve come across; there is no option to change the date format in Microsoft Planner. The date format itself is actually dependent on what language you’re viewing the page as.

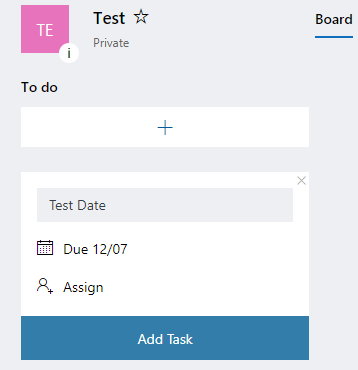
Here’s two tasks created on the same plan in the same tenant:

 12th of July, or 7th of December?

All I changed was the URL. The URL format will be https://tasks.office.com/adamfowlerit.com/en-us/Home/Planner/#/… and the ‘en-us’ component can be changed to ‘en-au’ or ‘en-gb’ (along with other languages most likely that I didn’t test).

Depending how I access Planner seems to generate different a different language.  There’s several ways this can be updated, but for an individual, you can change your regional format here https://myaccount.microsoft.com/settingsAndPrivacy/?languagesettings=true to display the format you want.

Microsoft Teams

If you’re using Planner inside Microsoft Teams, the date format shown is based on the App Language of Teams itself – which seems to default to English (United States) regardless of Planner, Office, or computer locale. To change:

In Microsoft Teams, go into settings (elipsis next to tenant name and profile)

Under the General area, scroll down to Language and the App Language dropdown. After selecting your region, make sure you click the ‘Save and restart’ button, or it won’t save your change at all.

After Microsoft Teams restarts, you should see the correct date format for Planner tabs.

To set it company wide or default as a user

Setting the language and region as per https://docs.microsoft.com/en-us/office365/troubleshoot/access-management/set-language-and-region does not seem to affect Teams (as I’ve had both set to en-au, logged onto a new computer and Teams has still been English (United States)

Patrick Lamber (MVP) found the following way to do it via PowerShell https://www.nubo.eu/Change-The-Display-Language-In-Your-Microsoft-Teams-Client/ as did Jesse Loudon https://purple.telstra.com/blog/automate-microsoft-teams-desktop-settings-with-powershell

There is a great writeup of the state of Language in Microsoft 365 here https://blog.thinformatics.com/2020/09/microsoft-365-language-confusion/ where the writer Jakob says:

Office Support and Recovery Assistant Tool

I was just made aware of this useful tool by Microsoft Support – the Microsoft Support and Recovery Assistant for Office 365 (also known as ‘SaRA’).

Even better, it’s not just for Office 365, other Office products can be scanned using this tool such as Outlook in Office 2010, 2013 and 2016.

The article above has a step by step guide for scanning Outlook for problems. It takes a few minutes to run, but will identify a bunch of possible issues you may have. But, from the results I see, I’d say everyone should run this tool regardless!

For example, my scan came up with this as one of the issues found:

The link goes here which then goes into details about the problem. I had noticed in Outlook 2016 by default, that users had sometimes mentioned they could no longer delete items from mailboxes they only had Inbox access to, and I assumed this was a change in behavior from Outlook 2010. This tells you how to toggle that setting if you’d rather the deleted items go to the other person’s mailbox, which removes the need for the delegate to have access to someone else’s deleted items.

If I’d run this at the start of the Office 2016 deployment during testing, it would have given me a better idea of potential issues that might come up. Here’s another one:

That’s not ideal at all! Again the link goes into more detail and this one seems really important –

Since it was patched in 2010 and 2013, but 2016 needs a registry change to fix it (why would they not just change the registry value in 2016 with an update?). This is something that may never get picked up without running this utility.
I’ve now got some work ahead of me to go through the rest of the issues from my scan, do testing and hopefully improve things. I’ve only looked at the Outlook component so far, and there’s other scans I’ll also need to try. Check it out and hopefully it’ll help you too.